How to Winterize Your Garden Hose, Sprinkler System & Tools — Plus Mums, Phlox & Gardenia Care
“Winter doesn’t just arrive—it judges. And your garden deserves to be ready before the first hard cold.”
Take the warmth of experience—then make your garden winter-proof
If you’ve ever turned on the faucet in spring and found a stubborn leak, a cracked hose, or a sprinkler zone that refuses to wake up, you already know the truth: Winterizing your garden isn’t “extra.” It’s prevention with peace of mind. How to Winterize Your Garden Hose, Sprinkler System & Tools — Plus Mums, Phlox & Gardenia Care is your calm, step-by-step guide—built from what I’ve learned the hard way, and what I’ve repeated successfully every cold season.
I’ll walk you through exactly what to do (and why), using US USDA hardiness zone timing and frost-date logic that also works for Europe’s temperature swings. You’ll get practical measurements in both °F (°C) and inches (cm), plus emotional “this is the moment you do it” guidance so you never feel rushed.
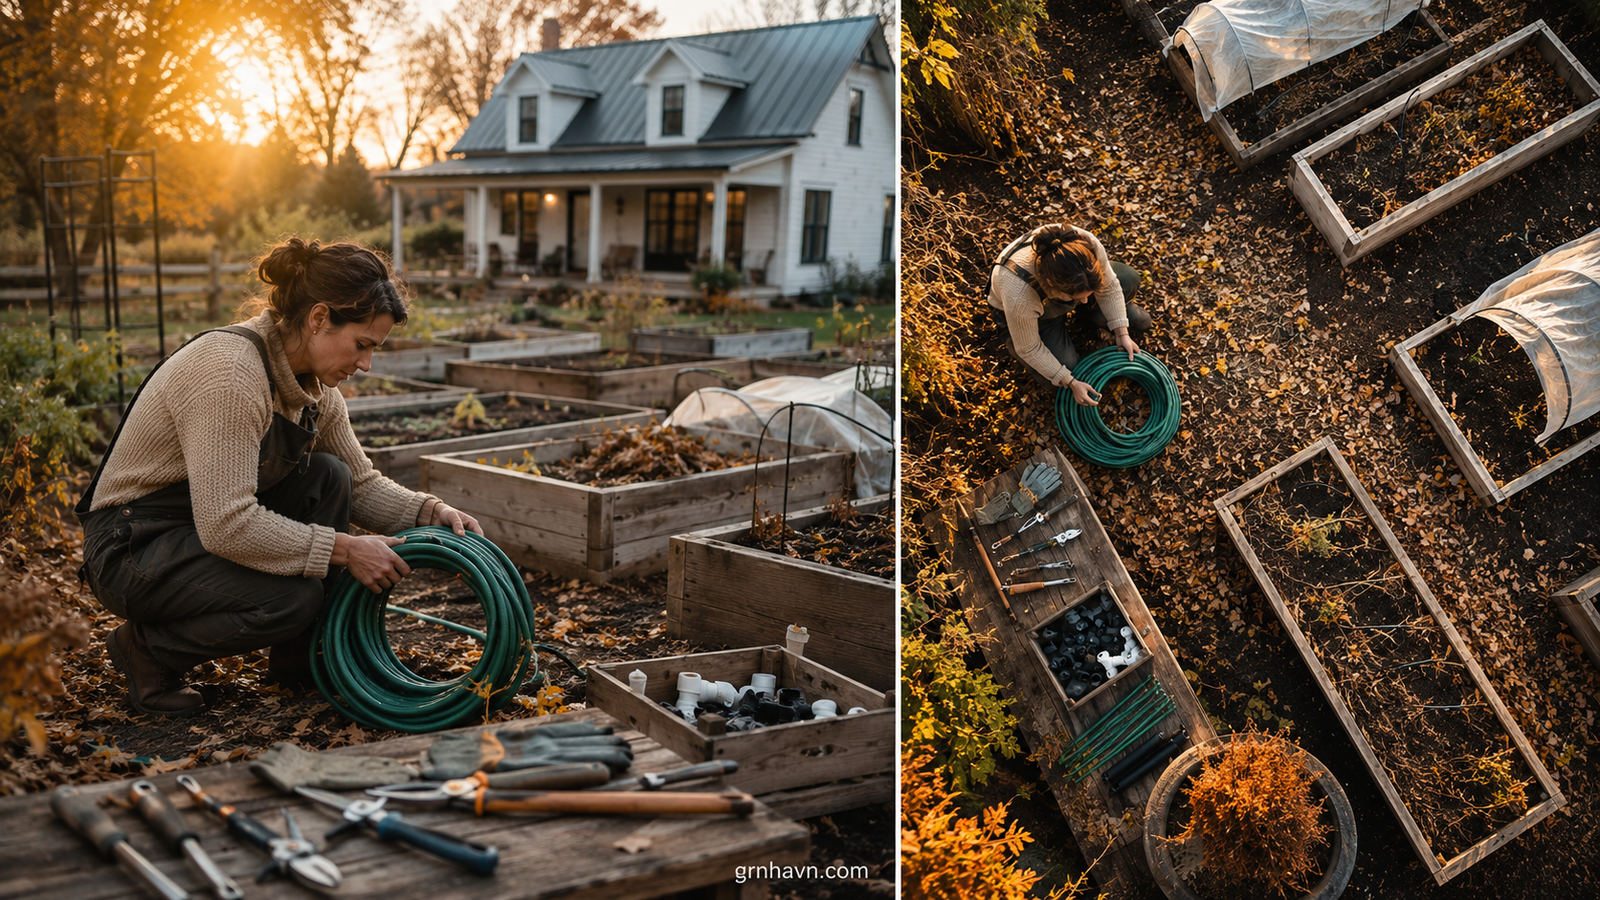
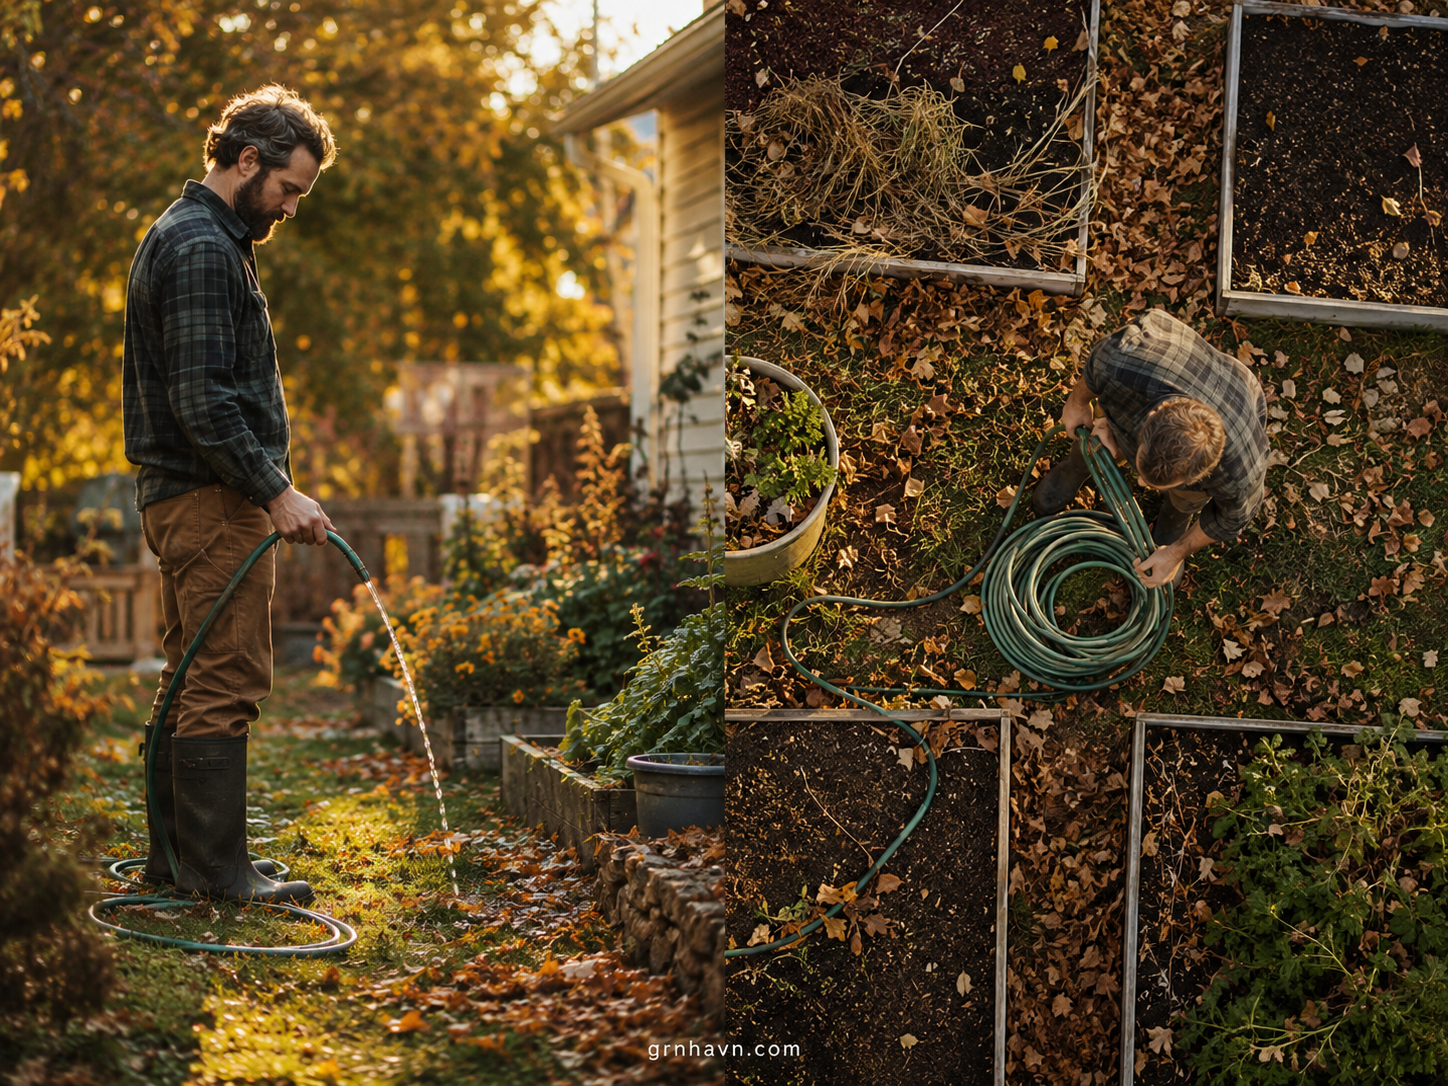
How To Winterize Garden Hose
“The goal isn’t to ‘store’ your hose—it’s to remove every drop that could freeze and split it.”
The first time I skipped hose winterizing, I told myself I’d “deal with it in spring.” That was my mistake. A hose can look fine—until a slow freeze expands water inside. That’s when you get tiny cracks that turn into leaks. So here’s the calm method I rely on.
Start by turning off the water at the spigot. Then detach the hose and lay it in a place where you can drain it completely. I like to coil it loosely (not tight like a spring) and gently shake it so water settles out of the ends and nozzle. If you use a sprinkler-style nozzle, remove attachments if possible—small pockets hold water longer than you think. For regions in the USDA zones where freezing starts earlier, don’t wait for a “perfect day.” Instead, watch for your forecast: when freezing nights begin to show up consistently, it’s time. In Europe, use frost temperature logic—when near-freezing weather becomes regular, treat it like a countdown.
Final step: store your hose in a cool, dry spot away from direct cold drafts. If you live where winters can be harsh (think around 20°F (-6°C) or lower), consider using an insulated cover for the storage area too. This is one of those small actions that feels almost invisible in winter—and incredibly noticeable when spring arrives.
You can usually find winter-ready hose storage solutions (hose reels, insulated covers, and quick-drain nozzle adapters) at your local garden center, home improvement store, or even some grocery seasonal aisles. Practical tip: choose a cover that fits the length of your hose coil—loose covers trap moisture and defeat the purpose.
For a budget-friendly alternative, check thrift stores, Facebook Marketplace, or hardware shops for used hose reels—just make sure parts aren’t brittle. You may also want a small labeling marker and a zip tie or two to keep fittings organized for quick spring setup.
Prefer fast online? Compare options on Amazon or use the curated product comparison list below for quick, hassle-free shopping.
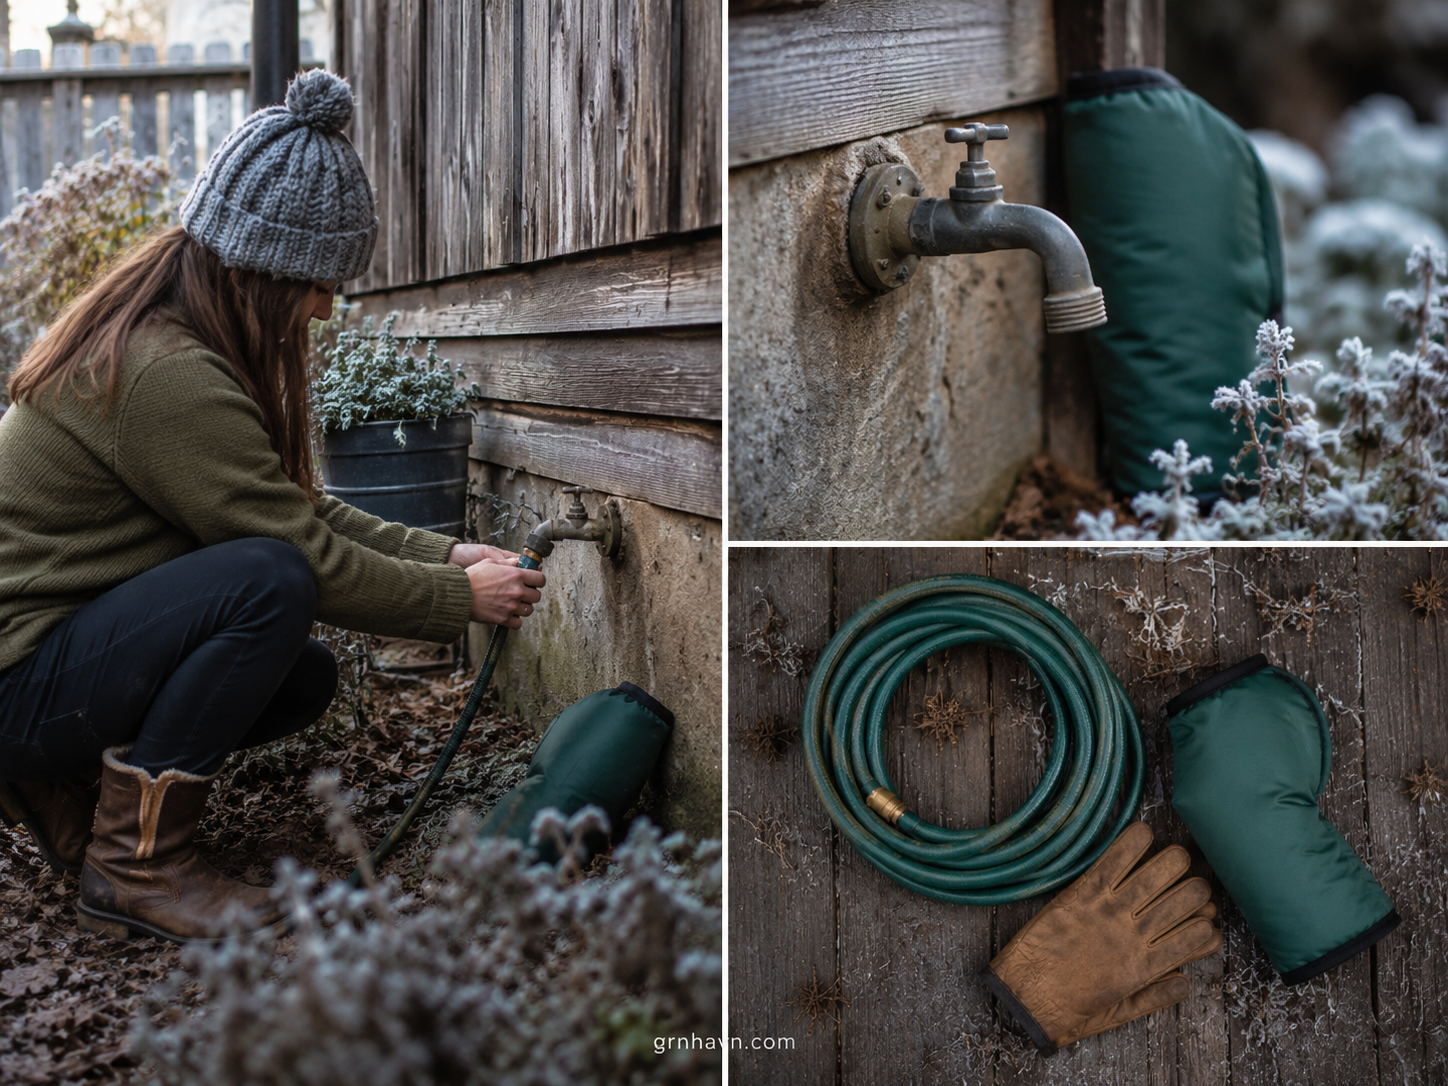
How To Winterize Garden Hose Faucet
“Think of the faucet as a quiet weak spot—small water lines can still freeze, even when everything else looks ‘winter-ready.’”
Hose faucets are the first place winter turns unfriendly. The inside portion of the spigot can hold a surprising amount of water, especially if the valve has worn slightly over the seasons. I’ve seen it happen in late-fall storms: everything looks done, then a cold snap finds the hidden pockets.
The safe routine is simple: turn off the exterior water source, then open the faucet to drain. Remove the hose (again—always), then let the water fully release. If your setup includes a backflow preventer, give it attention too—these parts can be water “traps” if you don’t drain properly. For timing, follow local reality: if your USDA zone typically drops below freezing in your area, winterize once freezing nights start to become consistent. In Europe, base it on your local frost timing and forecast lows—when daytime highs slip and nights stay near freezing for several days, it’s time to protect those valves.
Optional but often lifesaving: insulated faucet covers. When chosen correctly, they reduce freezing stress without forcing you to constantly babysit the weather. A personal favorite: keep the cover dry, and don’t cover while water is still dripping—insulation is for protection, not for trapping wetness.
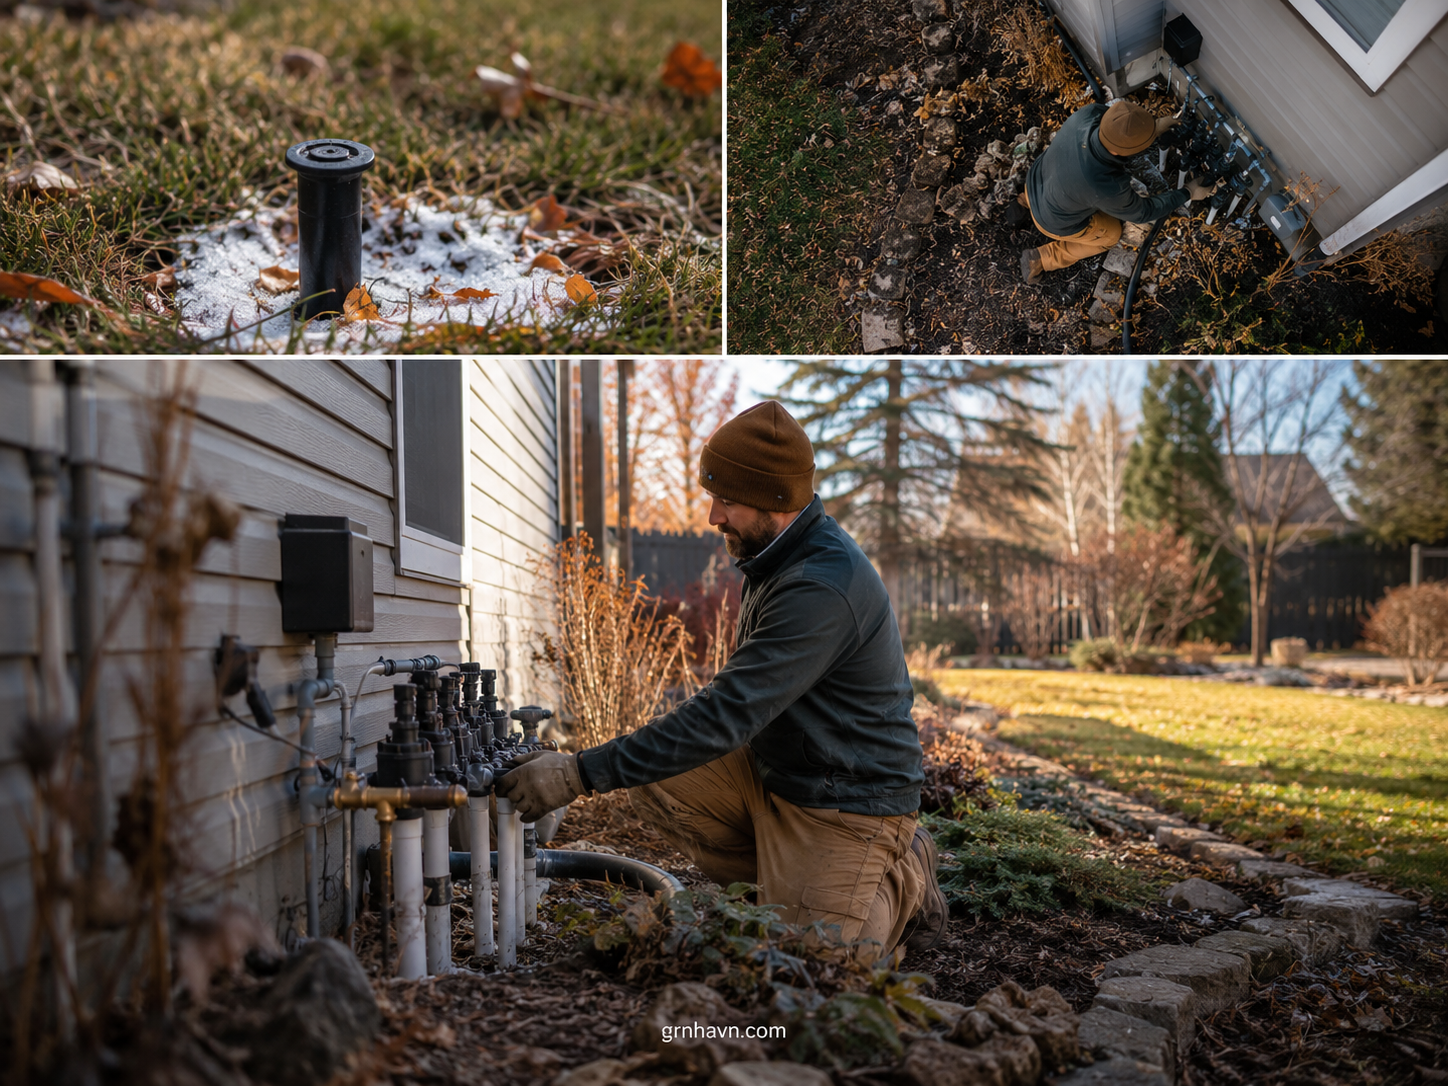
How To Winterize Sprinkler System
“Winterizing sprinklers is like putting your home on silent mode—remove pressure, remove water, and let the pipes rest.”
Here’s what separates a sprinkler system that survives from one that breaks: you need to manage water + pressure + timing. I’ve worked through the “why won’t it run?” frustration, and most problems trace back to incomplete drainage or freezing before the system was fully cleared.
The general approach is: shut off the water supply, drain the lines, and protect remaining components from freezing. In many regions, the standard timing is “before hard freeze.” For US gardeners, your USDA hardiness zones and local frost dates guide when freezing begins reliably. For Europe, use forecast lows and local frost logic—when sustained near-freezing weather becomes the norm, treat that as your cue. If you use a compressor for blowout, you’ll follow manufacturer guidelines and system specifics (pressure/volume depend on your system). For systems without a compressor, you can still winterize by fully draining and ensuring no water stays in vulnerable sections.
In practical terms: test your drain procedure, then verify. I recommend doing a final visual check and making sure no irrigation zones remain “wet” or exposed. If you’re unsure, this is a great moment to call a sprinkler professional—especially if your system has complex manifold setups. You’re not being “extra.” You’re being kind to your future spring self.
If you’re using a compressor method, you can often buy compatible accessories (blowout adapters, pressure regulators, and fittings) at your local hardware store, home improvement store, or sprinkler supply shop. Practical tip: bring a photo of your backflow/manifold setup so you match the right adapter—small fitment differences cause big frustration.
Another option: check Facebook Marketplace or local tool resale shops for a compressor—just make sure it can run the steady airflow you need and doesn’t leak. You’ll likely also want a few supporting items: hose adapters, thread seal tape, and gloves.
For quick online shopping, compare options on Amazon or review the curated product comparison list below.
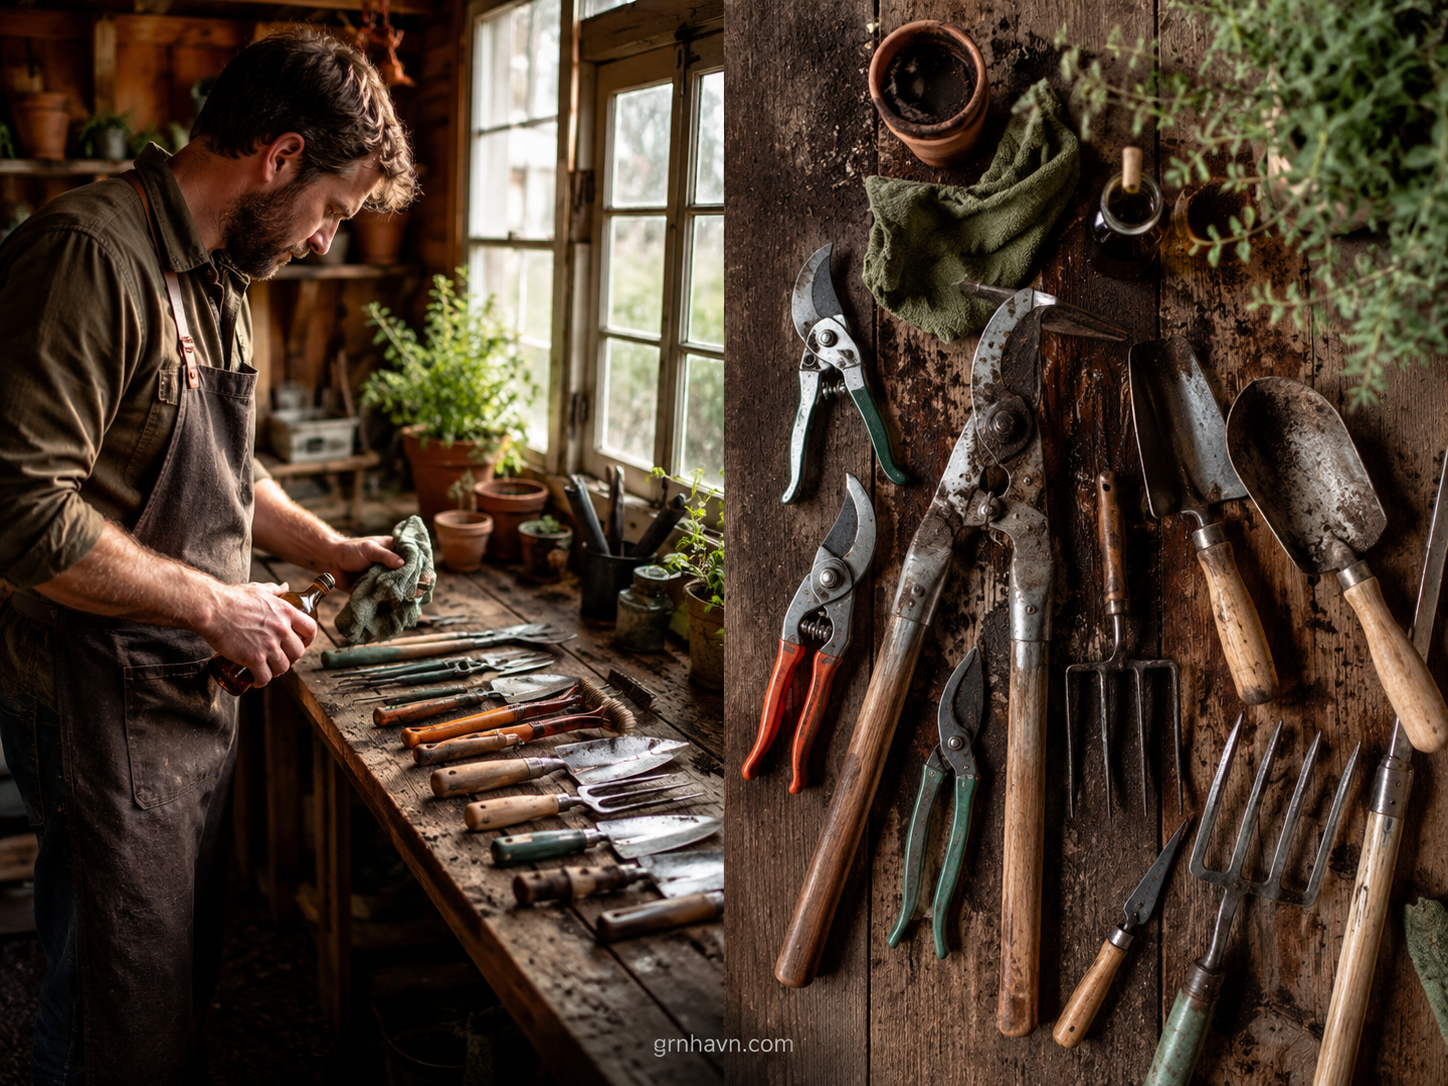
How To Winterize Garden Tools
“Rust is a slow heartbreak. Clean tools don’t just work better—they feel cared for.”
Winterizing tools is the part of gardening that feels almost indulgent. And yet, it’s one of the highest-return habits: cleaned, oiled tools come back sharp and ready instead of frozen in stubborn rust. I learned this after leaving a few hand tools outside “for just a little while.” The next spring they looked older than they were.
Start with brushing off soil and debris. Wash if needed, but don’t leave tools wet—dry thoroughly, especially at joints and hinges. Then oil metal surfaces lightly (think “thin coat,” not dripping). Wooden handles can get a boost from a quick conditioning wipe—just keep it natural and dry, so you don’t trap moisture. For storage, choose a dry, sheltered spot. If you store in a garage or shed, elevate tools off damp ground and keep them away from puddles.
My opinion: winter tool prep is also mental prep. It’s a gentle way of telling yourself, “I’ll be ready next season.” When your tools are organized and protected, your spring starts smoother—and you spend more time gardening instead of repairing.
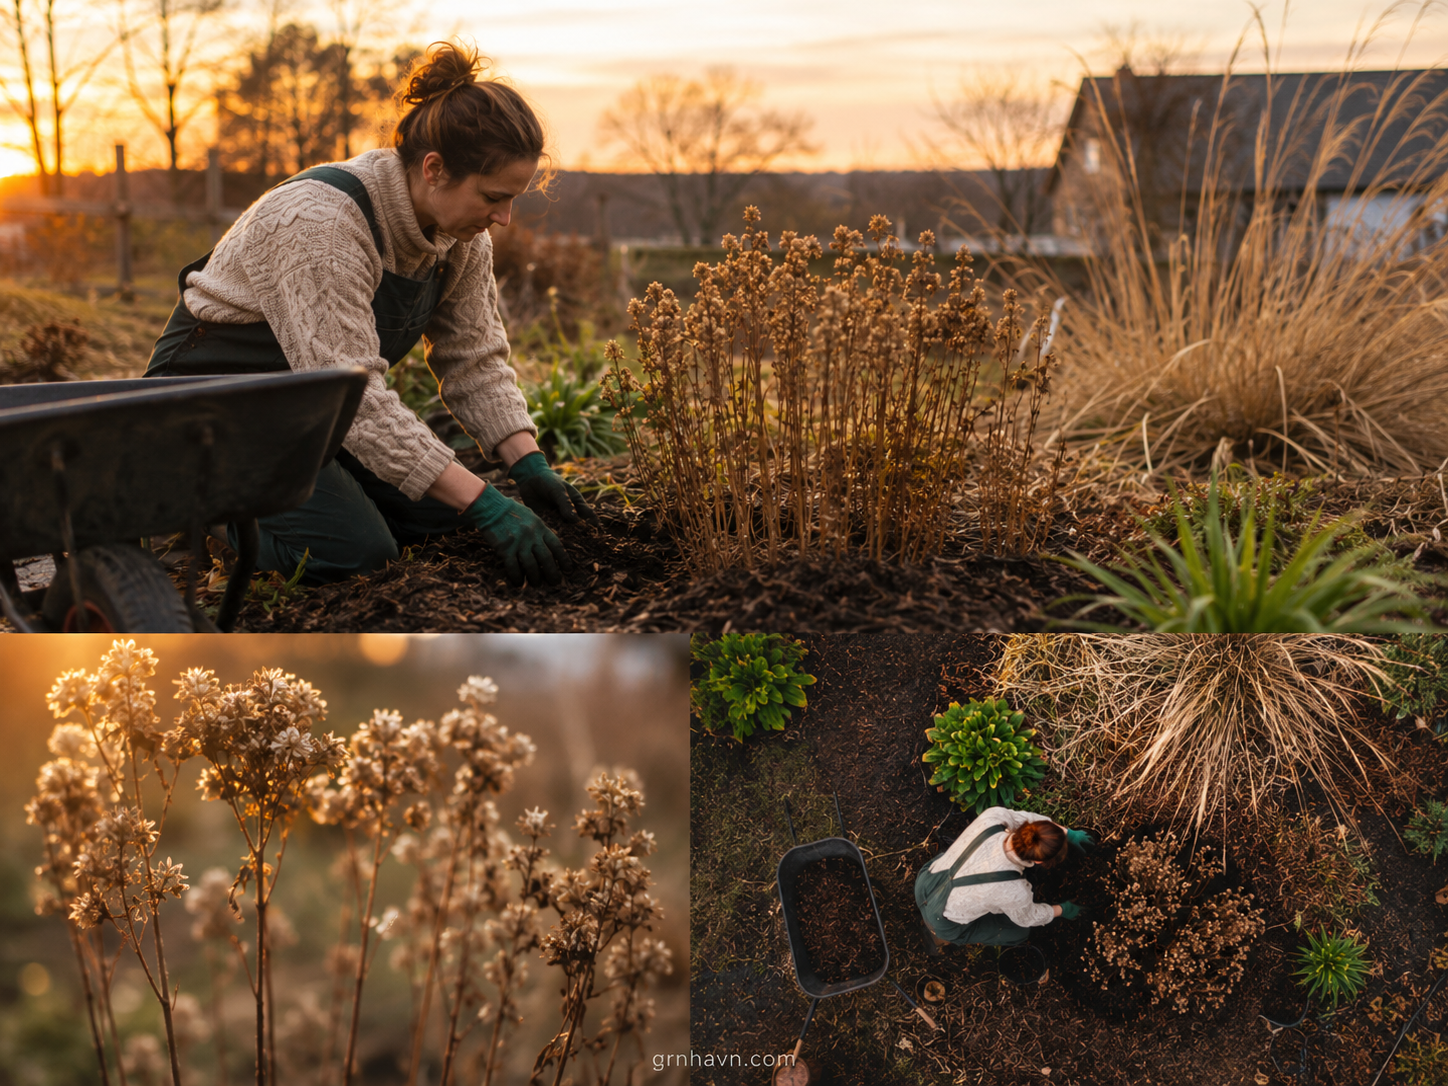
How To Winterize Garden Mums
“Mums don’t need perfection. They need consistency—warm roots, steady moisture, and protection from harsh swings.”
Garden mums are resilient, but winter can be their drama. The danger isn’t always the cold itself—it’s the repeated freeze/thaw cycles that rock tender growth and stress the roots. I treat mums like a foundation first, plant second: protect the root zone and keep moisture balanced.
A practical method: after the first light frosts have passed, add a mulch layer to insulate the roots. The sweet spot depends on your climate. In colder areas, a thicker layer helps; in milder regions, too much mulch can keep the soil wet and encourage rot. Think in ranges: roughly 2–4 inches (5–10 cm) as a starting point, adjusted to local conditions. Use frost-date logic for timing—when your area starts hitting consistent freezing nights, begin protection. In the US, let USDA zones guide you; in Europe, follow your typical frost season pattern and forecast lows in °F/°C.
Avoid heavy pruning late in fall. Instead, focus on removing spent growth only as needed and keeping the plant supported. If your mums are in pots, bring containers into a more sheltered spot where the root ball won’t freeze solid.

How To Winterize Garden Phlox
“Phlox winter care is mostly about restraint—don’t overdo it. Protect the roots, then step back.”
Garden phlox is often tougher than we give it credit for, but winter protection still matters—especially if your soil stays soggy or your site freezes unevenly. The goal is to reduce stress, not to smother the plant.
I recommend cleaning up dead foliage carefully in a way that doesn’t injure crowns. If disease was a problem during the season, remove affected material and dispose properly. For winter, add a light mulch layer to protect the crown and stabilize soil temperature. A typical mulch range is 1–3 inches (2.5–7.5 cm) depending on your winter severity. Timing follows the same logic: do it before hard, consistent freezing—use your local frost dates, USDA zones, and Europe forecast lows in °F/°C.
In spring, you’ll thank yourself by removing extra mulch once the risk of heavy frost passes. Again, restraint helps: too much mulch too early can keep crowns wet and invite issues.
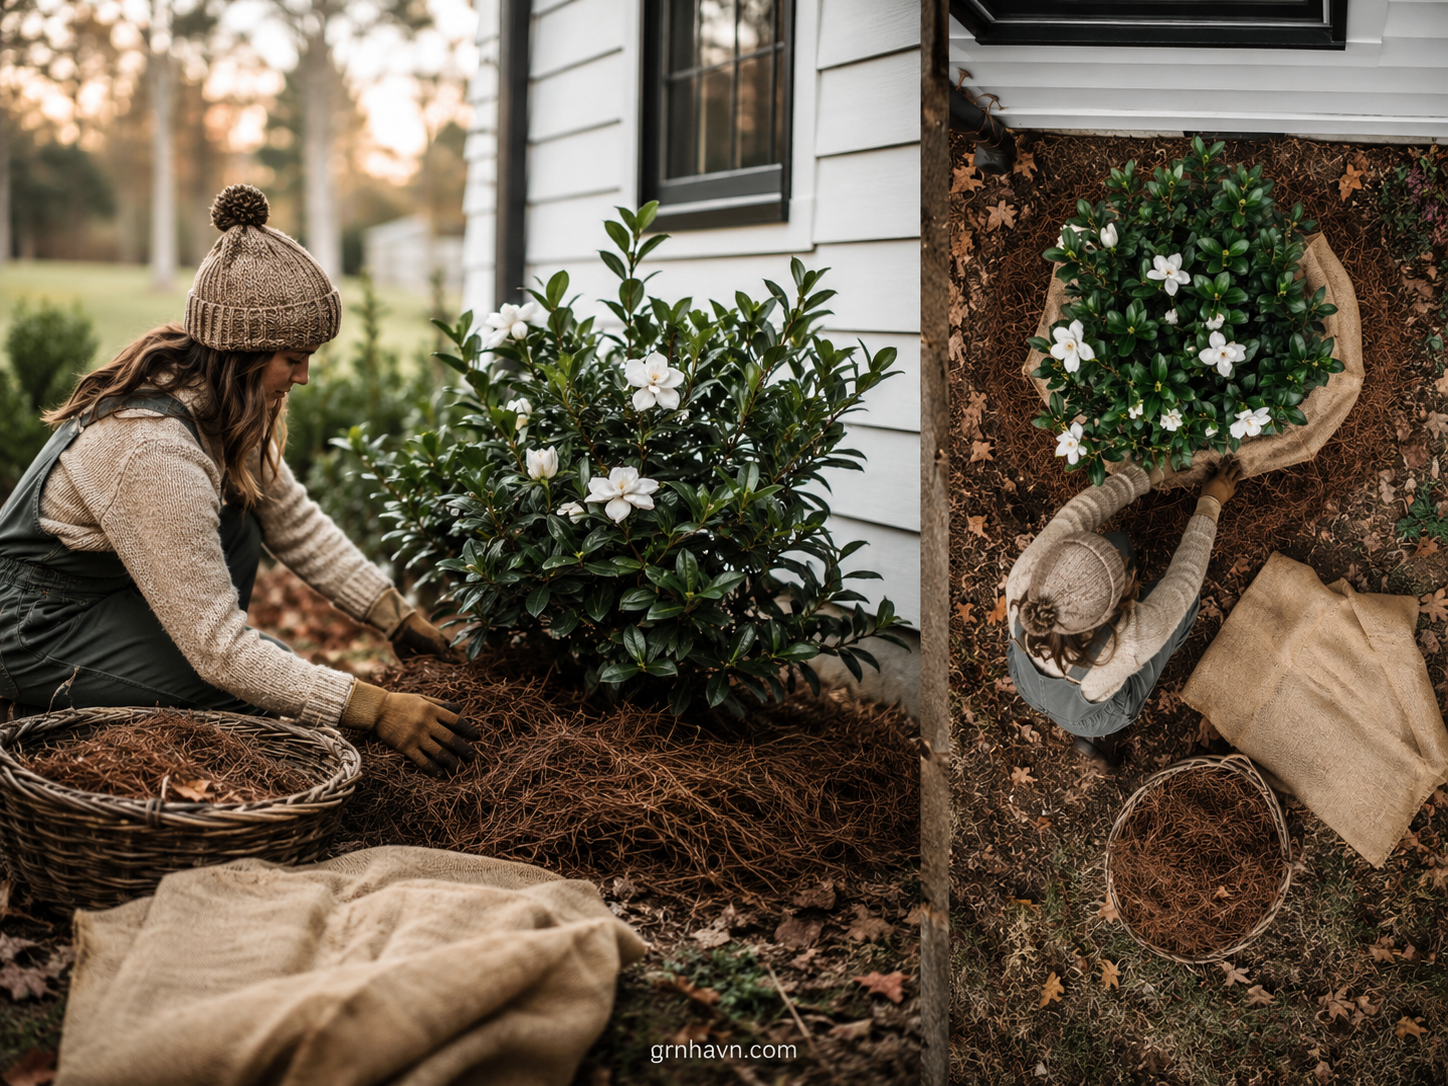
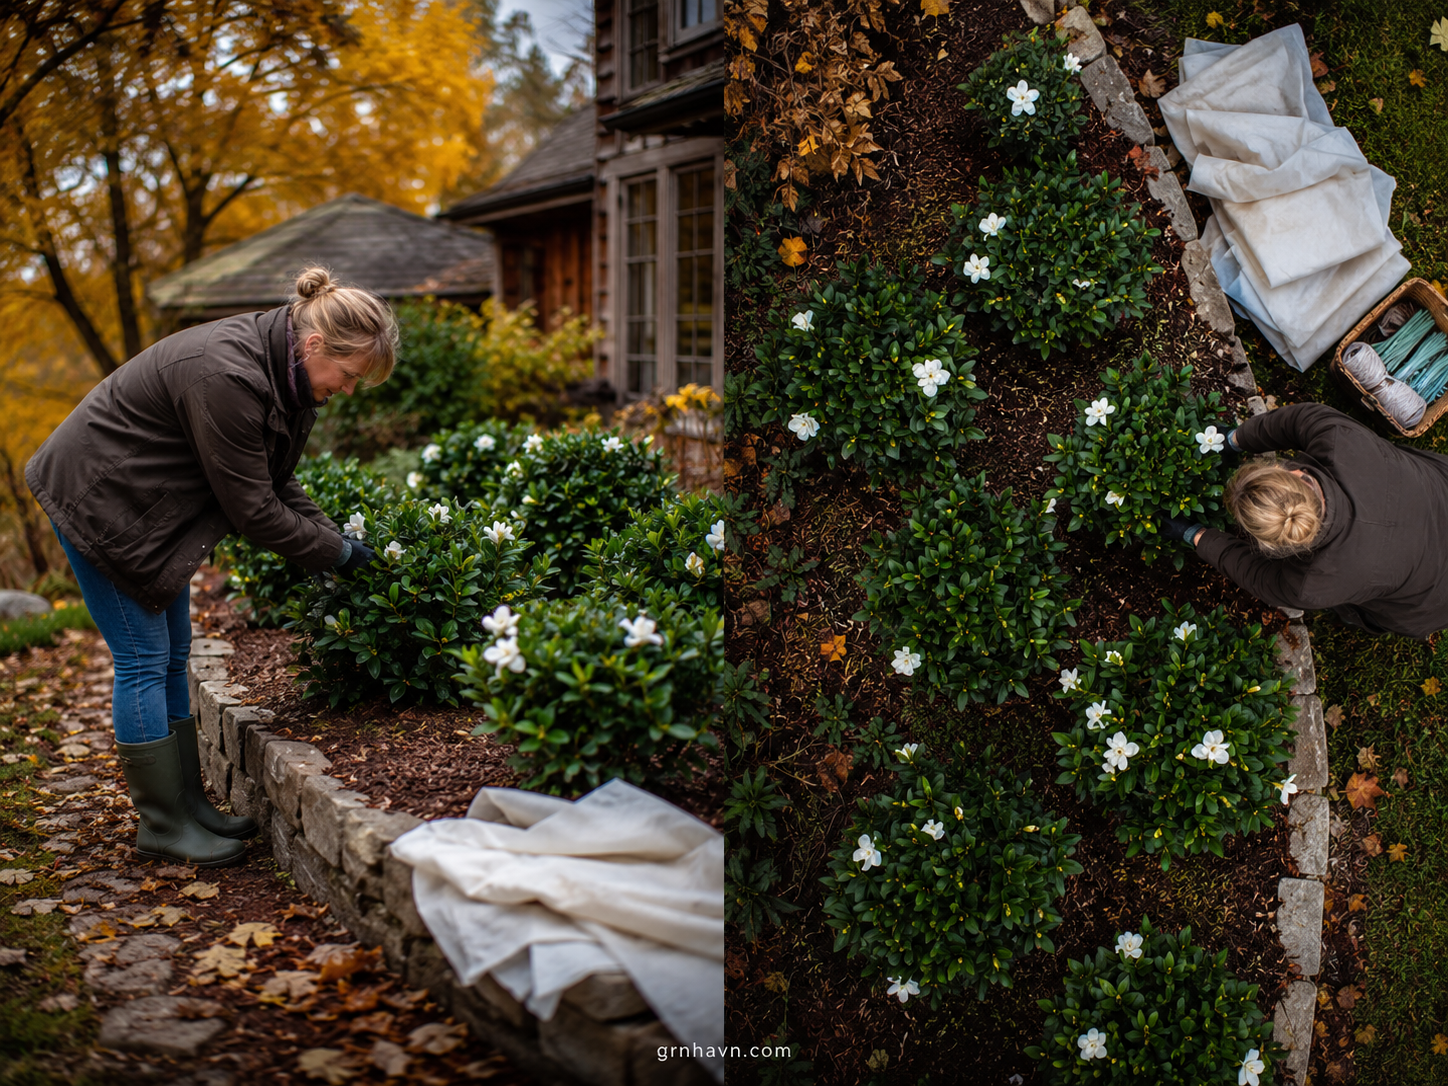
How To Winterize Gardenia Bush
“Gardenias hate surprises—cold drafts, sudden freezes, and wet roots. Give them a calm, sheltered winter.”
Gardenias are the kind of plants that make you slow down. Their beauty is worth it—but winter requires gentleness. When I first tried gardenias outdoors through winter, I underestimated how quickly cold wind can do damage, even when temperatures “seem” close to survivable. That’s why I focus on protection from both cold and moisture stress.
Start with root protection: mulch to insulate the base (often 2–3 inches (5–7.5 cm) as a balanced option). If your area drops into freezing ranges (again: use your local logic—USDA zones or consistent forecast lows in °F/°C), add a protective layer for the plant itself. For bushes, burlap wraps or breathable frost covers can reduce wind exposure while still allowing some airflow. Time this before hard freezes—when nighttime lows are trending into danger territory.
If you can, avoid overwatering in late fall. Wet soil plus freezing is a risky combination. Your aim is steady roots, not waterlogged roots. I also like to place a temporary shield to reduce direct wind blast—small windbreak changes can make a big difference.
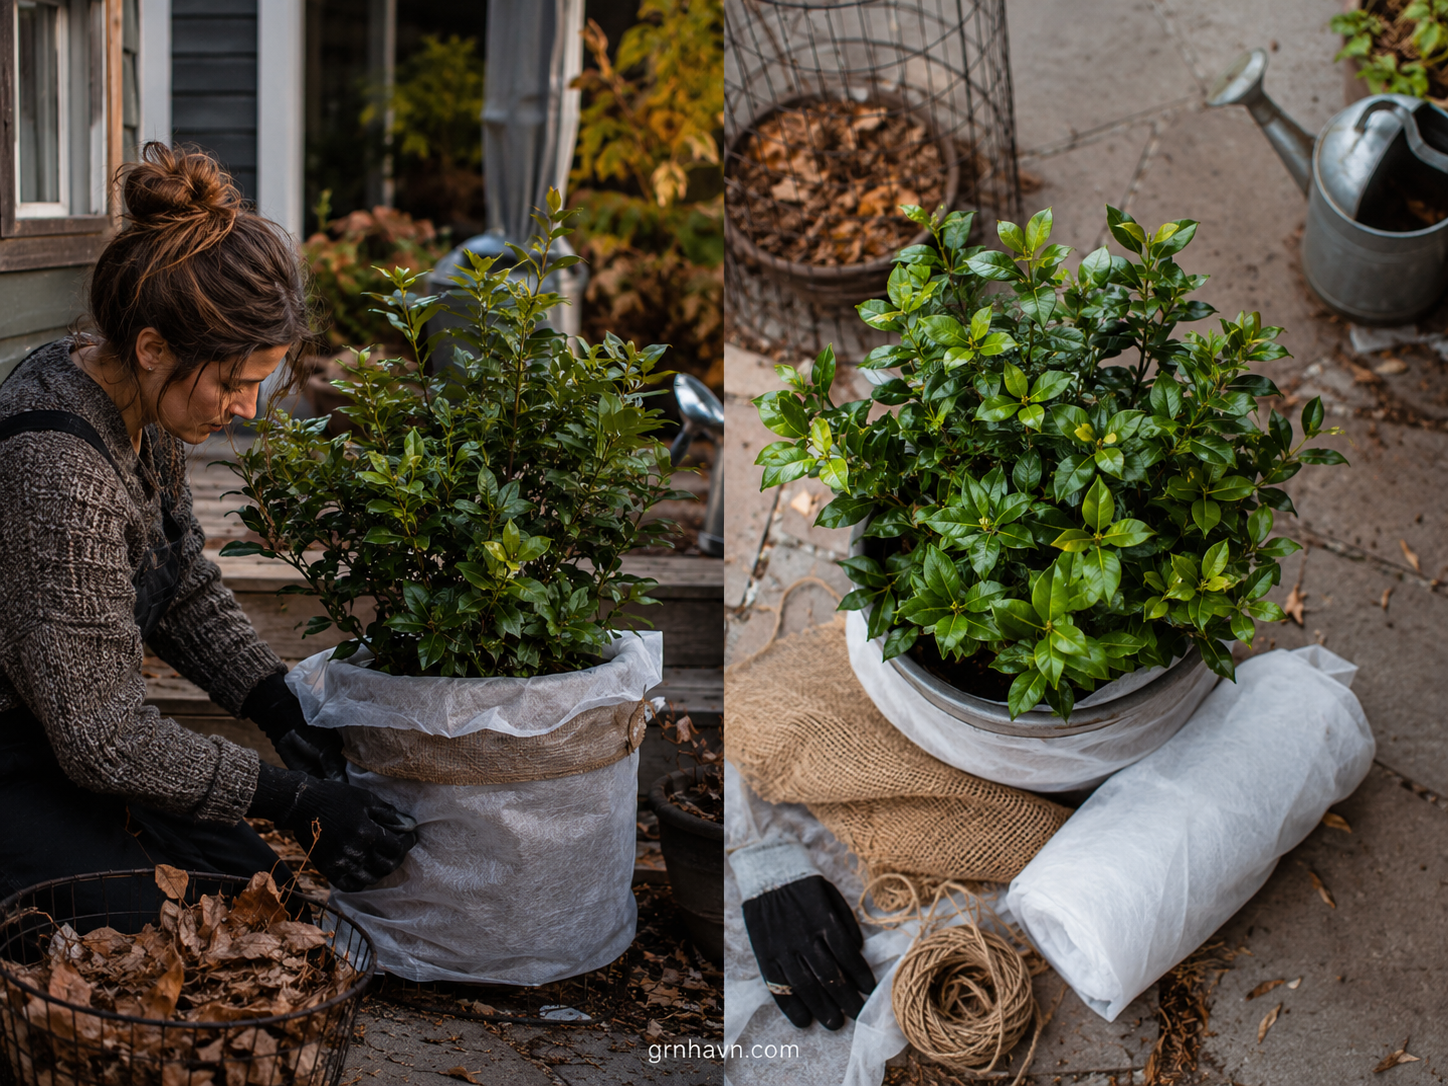
How To Winterize Gardenia Plant
“Treat your gardenia like a guest in winter—warm, sheltered, and gently managed.”
For gardenias, “winterize” isn’t one action—it’s a sequence of small protections that add up. If your gardenia is in the ground, it needs wind and cold protection. If it’s in a container, it needs insulation and—often—a sheltered relocation.
If you’re watching forecast lows in °F/°C, treat sustained near-freezing conditions as your trigger. In the US, compare your location to USDA hardiness zones; in Europe, use local frost-date patterns and your typical winter temperatures. For container gardenias, I recommend placing pots in the most protected microclimate you have—near a wall, under a porch, or inside an unheated but sheltered space. Wrap the pot insulation and keep the root ball from freezing hard. For in-ground plants, mulch the base and use breathable covering only when needed (and remove when weather allows).
My candid opinion: the biggest gardenia winter mistake is letting wet conditions linger. Keep moisture balanced. Don’t push late fall heavy watering. A little care now prevents the spring disappointment of a plant that looked fine—until it didn’t.
How To Winterize Garden Plants
“Winterizing garden plants is about giving roots stability—then making the garden look after itself.”
When people ask me “how do I winterize everything?”, I always tell them: you don’t have to do everything the same way. The secret is to think by plant vulnerability—roots, crowns, and exposure. Some plants need only mulch. Others need coverings. A few need temporary relocation.
Start with the basics: remove dead debris where disease was present, but don’t strip everything too aggressively. Stabilize the root zone with mulch, and choose thickness based on your local winter intensity—often 1–3 inches (2.5–7.5 cm) for moderate climates, and more only when your area experiences deep freezes. For timing, use frost-date logic: when you begin getting nights consistently below freezing (or reliably near it), begin protection. US gardeners can follow USDA hardiness zones; Europe gardeners can follow typical frost weeks and real forecast lows in °F/°C.
If wind is your problem, windbreaks and sheltered placement matter almost as much as temperature. I’ve seen plants survive colder spots simply because they weren’t exposed to harsh drafts. Your goal is stability—roots shouldn’t swing between wet cold and thawed cold.
How To Winterize Gardenias
“Gardenias don’t want heroics. They want the right shelter, the right moisture, and the right timing.”
Gardenias are worth it—yet they’re also honest about care. If you want a single, comforting routine, make it this: protect the roots, reduce wind exposure, and keep moisture gentle. I’ve guided friends and clients through this approach, and it works because it’s practical—not complicated.
Use your local winter reality to time it. In the US, consult your USDA hardiness zone and local frost dates. In Europe, follow consistent forecast lows and your typical frost season temperatures in °F/°C. When hard cold becomes likely, mulch the base. Then add breathable protection for the plant if your area truly freezes. If temperatures drop deeply, containers often need shelter indoors or in an unheated protected space.
My honest opinion: don’t overwater in fall “to help them.” Wet cold conditions often stress gardenias more than dryness does. Instead, water reasonably before colder weather arrives, then let winter do its quiet work—shelter and stability.
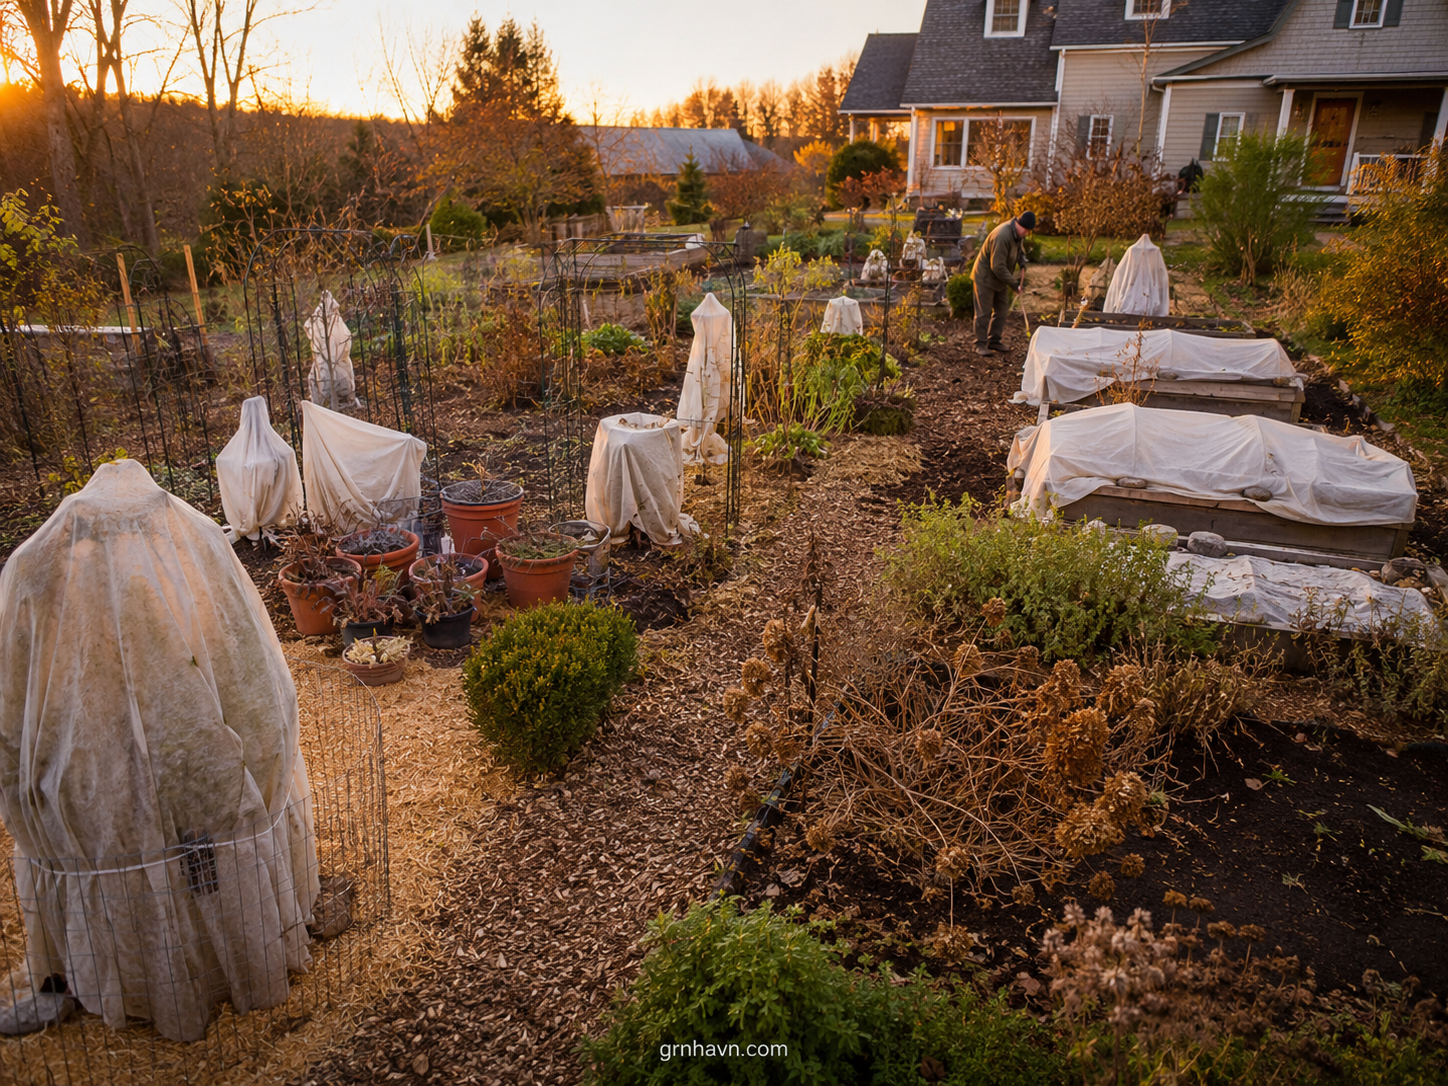
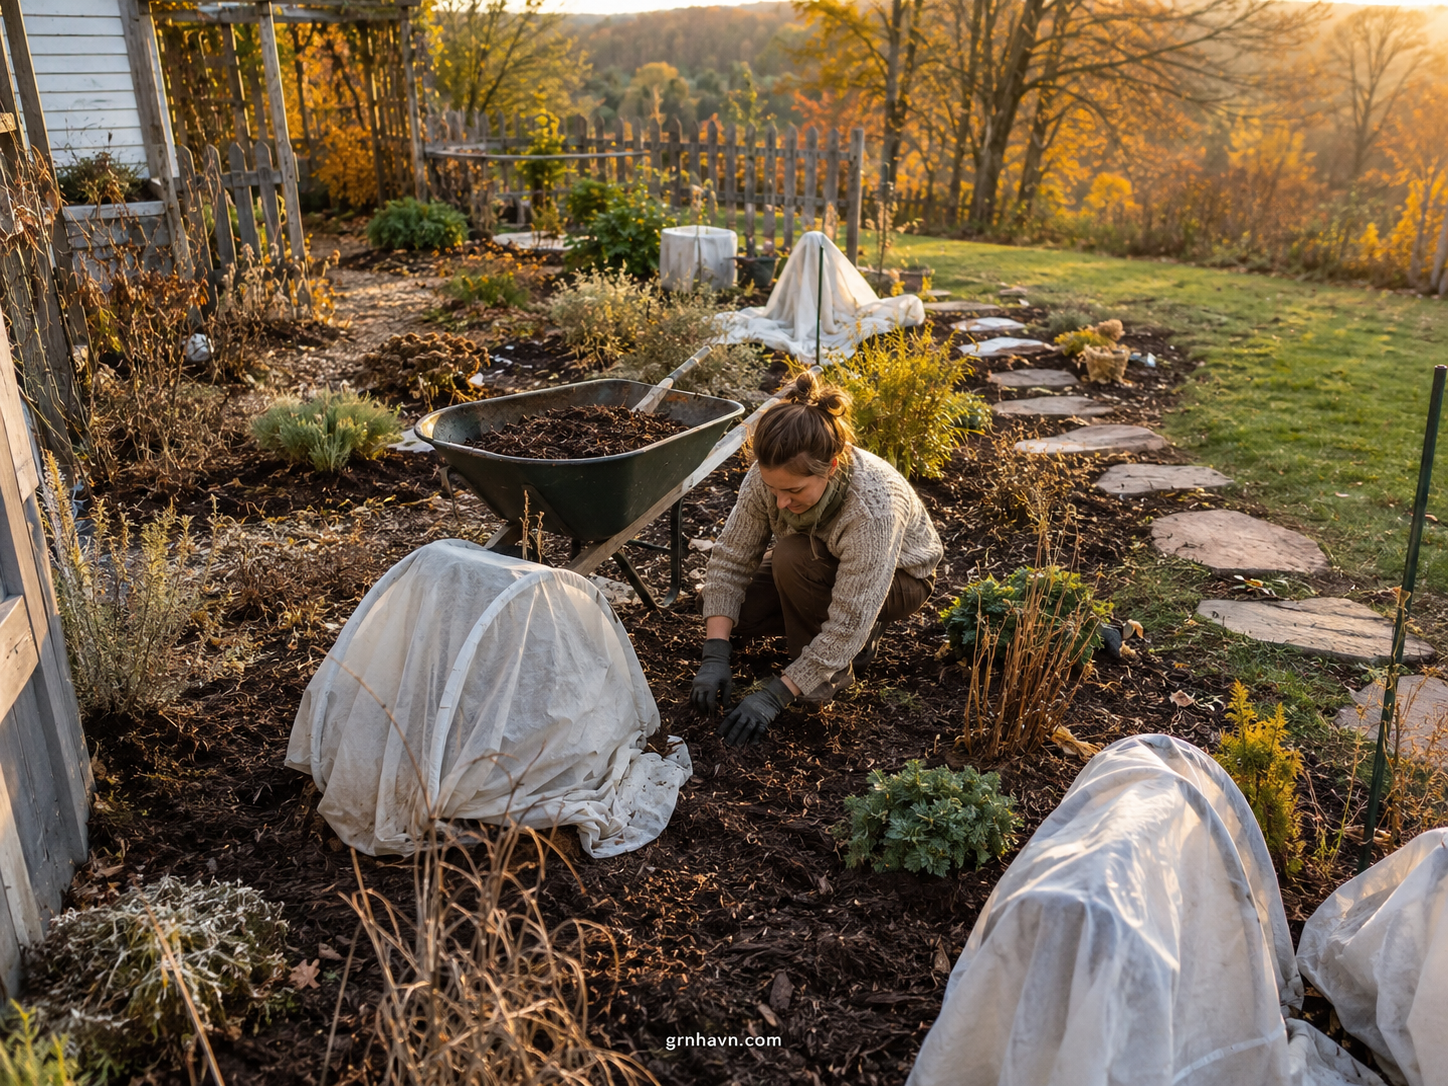
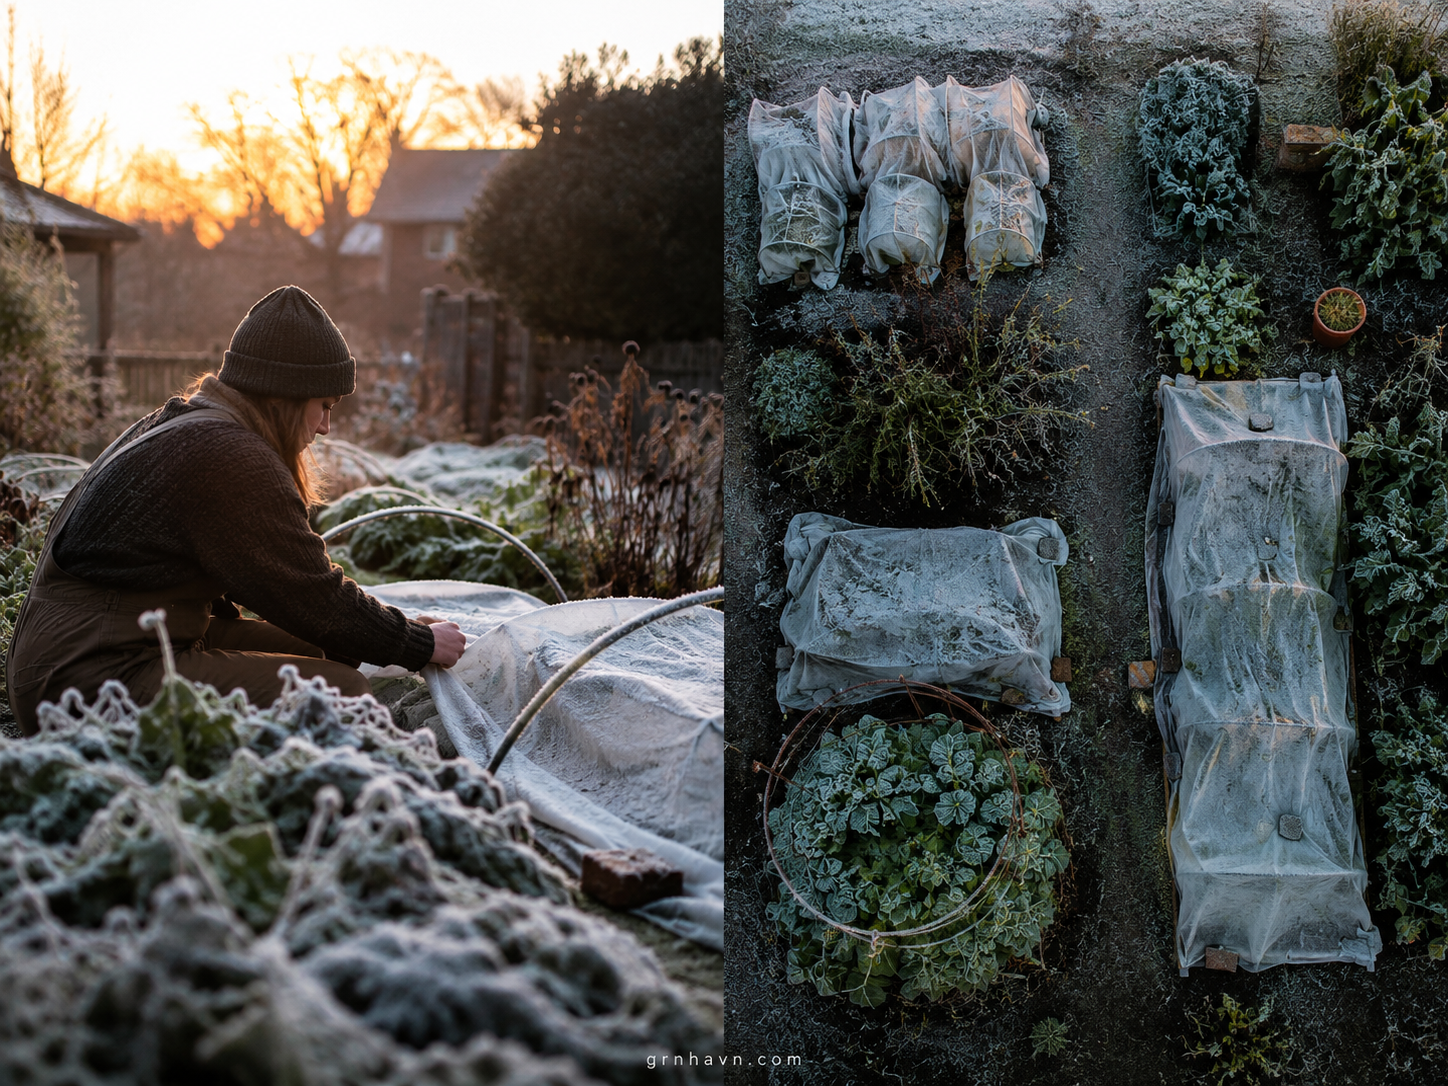
How To Winterize Outdoor Plants
“Winterizing outdoor plants is a choreography: cover what’s vulnerable, protect what’s exposed, and leave what’s naturally sturdy alone.”
This is the umbrella section—because not every plant needs the same kind of equipment. When I think about outdoor winter prep, I focus on what equipment actually helps: mulch, breathable covers, and (sometimes) temporary wind shields. I don’t recommend blanket coverage for everything—especially if your goal is healthy airflow.
Use frost logic and timing: before your first sustained hard freeze, prepare your vulnerable plants. For many gardens, that’s when night lows are consistently flirting with freezing. In USDA zone areas, treat your seasonal forecast as the real calendar. In Europe, track frost weeks and temperature swings. Equipment-wise, this overlaps with earlier hose/sprinkler topics mainly through the “don’t rush” principle—use the right tools at the right time. Cover fragile crowns, mulch the root zones, and keep coverings breathable.
If you’re worried about frost exposure, combine simple tactics: a light mulch layer (1–3 inches / 2.5–7.5 cm), temporary frost cloth or cloches for the most sensitive plants, and wind protection where needed. That’s the layered approach that feels effortless in winter—and rewarding in spring.
Protect Garden Plants From Frost (In Brief)
“Frost protection works best when you’re early—not when the cold has already settled in.”
In brief: frost protection means stabilizing the parts most likely to suffer—crowns and exposed stems. Use mulch to insulate roots, then cover only the vulnerable plants when a hard frost is expected. For colder snaps, breathable covers and temporary cloches help reduce direct chill. Avoid trapping wetness for long periods—too much moisture under coverage can be a problem.
Timing is everything. Use your local frost-date logic: for US gardeners, USDA hardiness zones and local frost timing guide when freezing becomes reliable. For Europe gardeners, rely on forecast lows in °F/°C and frost weeks. A good rule of thumb: protect before sustained freezing, not after the first dramatic freeze.
What Not To Do (Overwatering/Late Pruning)
“The fastest way to lose progress is to water later, prune later, and hope winter is gentle.”
Overwatering in late fall
- Wet soil + freezing can stress roots and increase rot risk.
- Container plants are especially vulnerable if drainage isn’t excellent.
- Water before cold arrives, then scale back.
Late pruning surprises
- Late pruning can stimulate tender growth that winter will damage.
- For shrubs like gardenia, protect instead of cutting back harshly.
- Remove only what’s necessary and keep timing conservative.
Common Mistakes
- Leaving hoses connected “just in case.” (That trapped water is the enemy.)
- Assuming “it didn’t freeze here” means your pipes are safe—microclimates exist.
- Covering everything tightly, trapping moisture and encouraging rot.
- Winterizing too late—after a sudden cold snap.
- Forgetting smaller tools and attachments (nozzles, adapters, backflow parts).
Final Printable Checklist
A gentle, one-page guide you can print. Tick as you go—this is your winter calm.
Timing reminder: use USDA hardiness zone + frost-date logic (US) and Europe frost/temperature forecasts (°F/°C).
FAQ (Quick, Clear, Human)
How to winterize a sprinkler system step by step?
Shut off the water supply, drain lines, relieve pressure, and ensure no water remains in vulnerable sections. Then protect exposed components before sustained freezing.
What tools are needed to winterize a sprinkler system?
Common tools include shutoff access, hose/adapter fittings for drainage, and sometimes a compressor with compatible blowout attachments—plus gloves and towels for clean-up.
How to winterize a garden hose?
Detach the hose, drain completely, coil loosely, and store in a dry, sheltered place so trapped water doesn’t freeze inside.
What are winterizing sprinklers?
Winterizing sprinklers means preparing your irrigation system so water doesn’t freeze and damage pipes, valves, and sprinkler heads.
What is the 3 times rule for sprinklers?
Typically, it refers to applying longer run times during warmer months to match plant needs—however, winterizing itself is about drainage and freeze prevention, not irrigation timing.
At what temperature do I need to winterize my sprinkler system?
When freezing is likely to be sustained—often around 20–28°F (-6 to -2°C) risk—use local forecasts and your frost-date logic.
How many psi to winterize a sprinkler system?
It depends on your system and compressor setup. Always follow manufacturer guidance and local sprinkler service best practices—don’t guess.
What tools does a sprinkler fitter use?
Adapters, pressure/flow measuring tools (in some cases), shutoff tools, drainage fittings, and compressor-related attachments when blowout is used.
How to winterize sprinklers without a compressor?
Drain and relieve pressure thoroughly using drainage procedures, then protect vulnerable parts. Some systems rely on anti-freeze drain designs; follow your system type.
How do you winterize a garden irrigation system?
Shut off water, drain lines, and ensure no trapped water remains. Then protect components from freezing winds and exposure.
What happens if I don’t winterize my sprinkler system?
Water can freeze inside pipes and fittings, causing cracks, leaking valves, and damaged sprinkler heads—often expensive to repair.
How to start sprinklers after winterizing?
Reconnect supply, check for leaks, open valves carefully, then test each zone slowly to confirm pressure and spray coverage.
How to prepare a sprinkler system for winter?
Plan before hard freeze: shutoff, drain, verify no water remains, and protect exposed components.
Is 20 psi enough for a sprinkler system?
It depends on your system and drainage method. Many setups require specific airflow/pressure guidance, so follow the correct instructions.
How many cfm for sprinkler blowout?
CFM requirements vary by system size and line length. Use manufacturer/service guidance rather than generic values.
What are the 4 types of sprinkler systems?
Common categories include fixed spray, rotors/rotary sprinklers, drip irrigation, and subsurface irrigation—your system design determines the winterizing steps.
What are 10 examples of tools?
Examples: shutoff key, gloves, rags, towels, drainage adapters, backflow tools, compressor (optional), pressure regulator, thread seal tape, and protective hose covers.
What type of tool is a sprinkler?
Sprinklers are irrigation devices; they aren’t “tools” like a spade. In plumbing terms, they function as fixtures within a distribution system.
How much water is 20 minutes of sprinkler?
It depends on sprinkler output (precipitation rate). Check the manufacturer’s flow/coverage specs to estimate gallons or liters per minute.
What month should you winterize your sprinkler system?
Generally before your first hard freeze. Many places do it in late fall (often October–November in the US, depending on region).
How to winterize a sprinkler system with a compressor?
Shut off water, connect the proper adapter, follow correct blowout guidance, ensure zones drain appropriately, and check that no water remains in heads/lines.
How do you winterize a sprinkler system without air?
Use drainage-based winterizing methods: shut off supply, drain lines completely, and verify that water can’t stay trapped in valves or sections.
Why do you not flow the sprinkler system in cold weather?
Because running water can freeze inside pipes/heads, causing damage—winterizing is about preventing freezing, not testing it.
How much should it cost to winterize a sprinkler system?
Costs vary by region and system complexity. A typical range depends on labor, number of zones, and whether compressor blowout is included.
What is the best water pressure for a sprinkler system?
Best pressure depends on nozzle/rotor specs and distribution design. Follow manufacturer requirements for consistent coverage.
What is the 30/30 rule for irrigation?
Commonly it refers to watering cycles and pauses to prevent runoff (varies by soil and system). Winterizing is separate from irrigation scheduling.
How much pressure is 1000 feet of water?
Pressure depends on density and elevation; it’s not a straightforward “garden sprinkler” comparison. For irrigation, use your system’s pressure specs and local plumbing guidance.
What is the best mixture for raised bed soil?
For general raised beds: a balanced blend of compost, topsoil, and a quality soil component (like coco coir/coarse material) works well. Tune for drainage and your crop types.
How to winterize a sprinkler system with a compressor?
Shutoff and blowout are done before freezes. Use correct adapters and follow zone-by-zone procedure so water fully clears from lines and heads.
Why do you not flow the sprinkler system in cold weather?
Because water can freeze in transit—this can crack pipes and damage valves and sprinkler heads.
How do you winterize a sprinkler system without a compressor?
Drain thoroughly using the system’s drain valves and ensure no water remains. Many setups can be winterized with careful drainage if designed for it.
How do you winterize a garden irrigation system?
Turn off, drain, relieve pressure, and protect vulnerable components before freezing temperatures arrive.
How do you winterize sprinklers without air?
Use drainage and shutoff procedures specific to your system; confirm no water is trapped in lines or fittings.
Final Verdict: Winterizing Doesn’T Have To Feel Scary
When I plan winter care, I’m really planning for spring comfort. Winterizing your garden hose, sprinkler system & tools is the “boring” work that quietly protects everything beautiful you want later.
And when you pair that with warm, grounded plant care—mulching mums, stabilizing phlox crowns, and sheltering gardenias based on your USDA hardiness zones or Europe frost logic—you’re not just following instructions. You’re building a garden rhythm that works with the weather instead of fighting it.
My experience-based opinion is simple: do it in one focused session, keep it gentle, and let the checklist be your best friend. When you’re done, you’ll feel it—the relief that comes when winter has fewer reasons to surprise you.