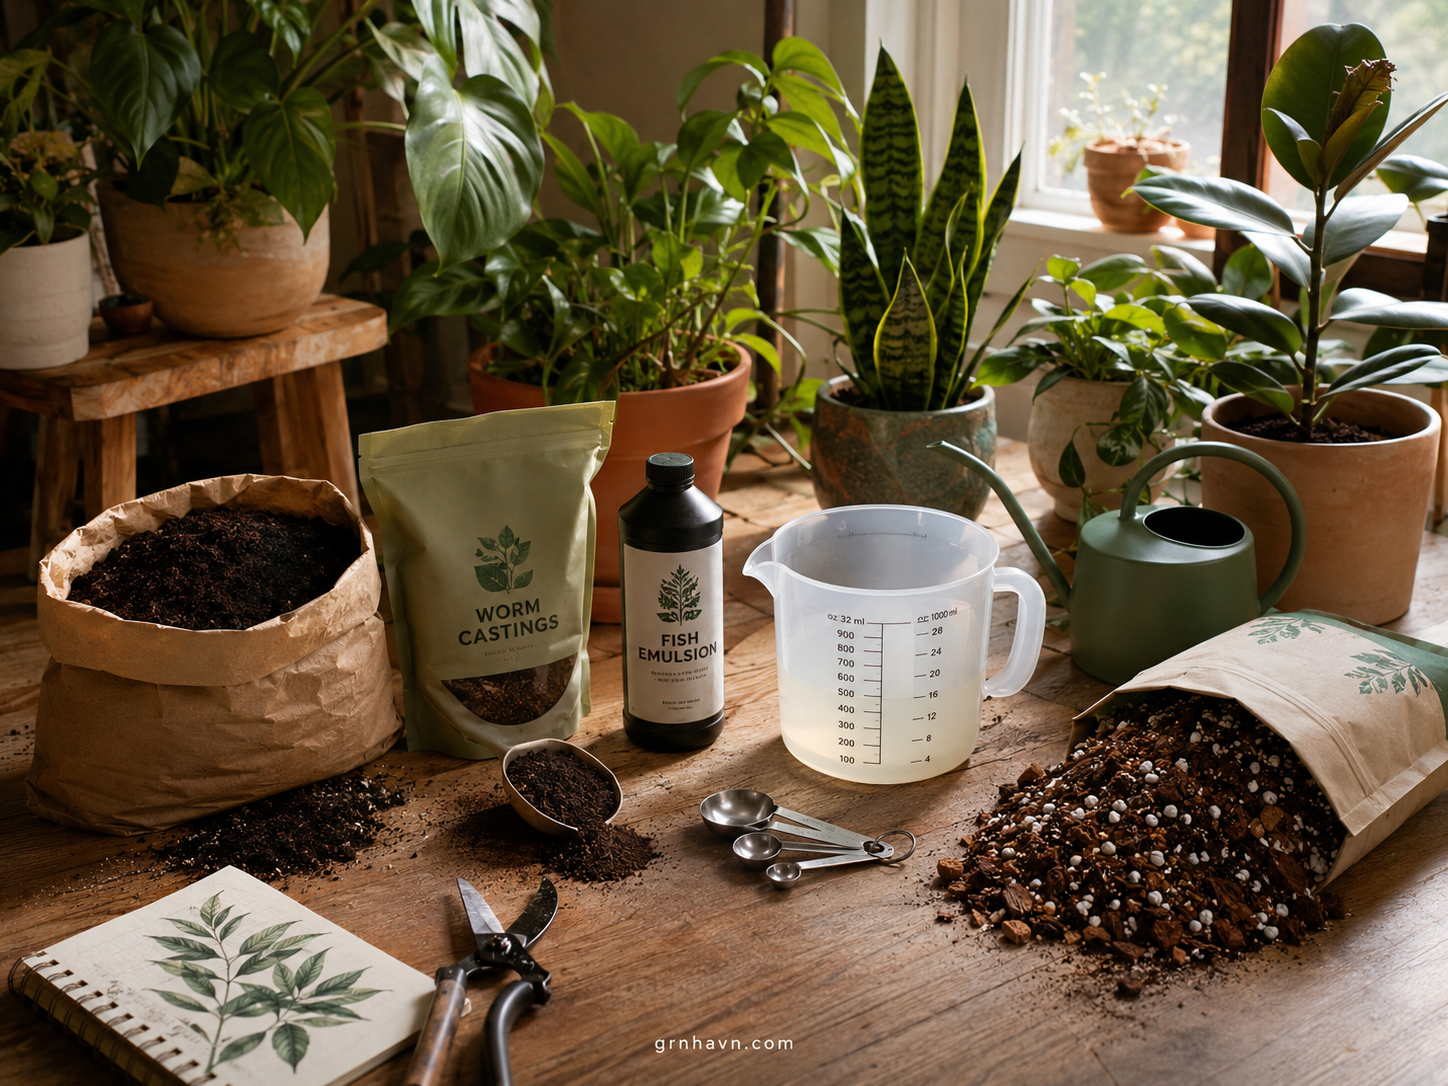
7 Best Compost & Fertilizer Products
for Healthy Plants
If you want indoor-friendly growth that feels calm—not chaotic—this is the guide I wish I had years ago: screened compost for gardening, pure worm castings, low-odor fish emulsion, and the measurement tools that prevent fertilizer mistakes before they happen.
“The secret to strong plants isn’t more fertilizer—it’s the right product, the right dose, and the patience to water like you mean it.”
Looking for the best compost and fertilizer products? I get it—because I’ve been there: you bring home that beautiful new pot, the soil looks “fine,” but two weeks later the leaves are dull, the growth feels slow, and you’re left wondering whether it’s light, water, or nutrients.
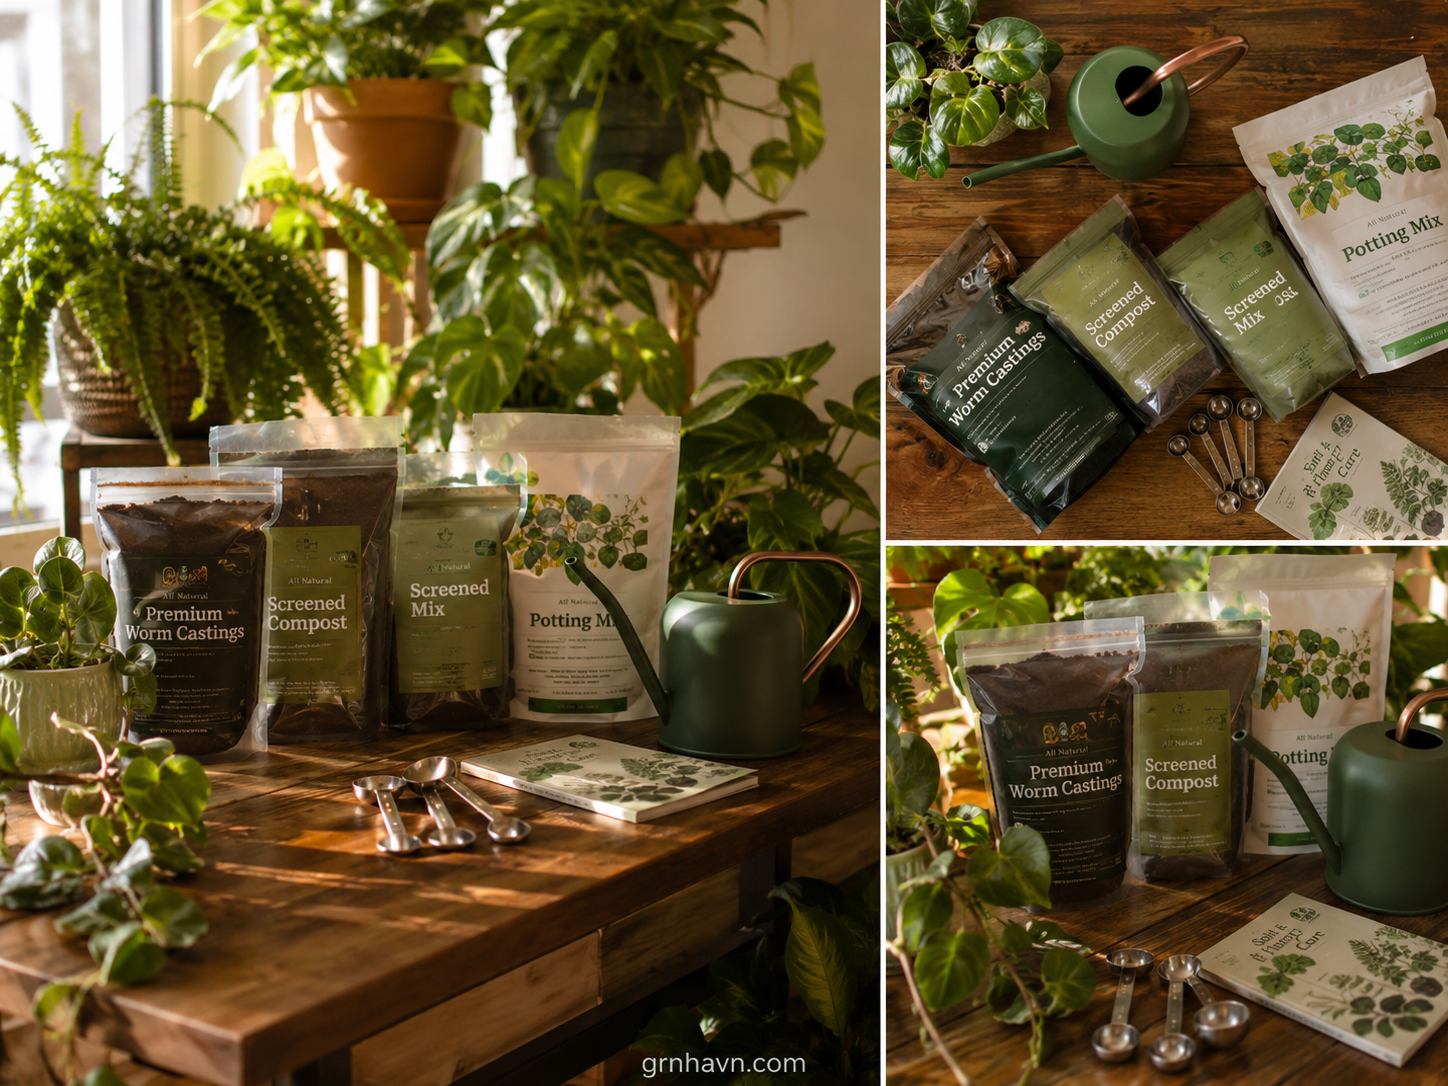
After thousands of container plants cared for through real seasons (and real mistakes), I learned something simple: indoor feeding fails most often when the product is inconsistent or the dosing is guesswork. That’s why I’m sharing a tight, reliable lineup—sieved compost for gardening, screened compost benefits for better texture, pure worm castings, bagged worm castings, and low-odor fish emulsion designed for gentler indoor plant feeding.
I’ll also show you the “boring” tools that change everything: measuring spoons for fertilizer, a mixing jug for plant nutrients, and a small watering can with a fine spout—because accuracy is kindness when you’re growing in pots.
And yes, we’ll talk timing the way gardeners actually live it: match feeds to growth (not a fixed calendar). In the US, use USDA hardiness zone + frost-date logic; in Europe, listen to temperature and shorter daylight. Your plants don’t know what month it is— they respond to light, warmth, and careful nutrition.
What you’ll be able to do after this guide
- Choose compost + fertilizer products that behave well in containers (not random, not too active).
- Use screened compost benefits and proper potting mix with good drainage to reduce salt stress.
- Dilute fish emulsion safely (label-first) and avoid fertilizer dosage mistakes.
- Feed with indoor plant feeding rules that adjust for US/EU winter slowdown.
- Know when to top-dress vs mix-in—and how to water right after.
Table of Contents
1) Container-Friendly Compost (Sieved/Screened): The “Top-Dress Control” Pick 2) Worm Castings (Pure, Bagged): Gentle Root Support for Pots 3) Low-Odor Fish Emulsion (Indoor-Friendly): Liquid Nitrogen Support (Dilution First) 4) Graduated Mixing Jug (mL + oz/gal scale): Accuracy That Prevents Mistakes 5) Small Watering Can (Fine Spout): The Flushing & Gentle Feeding Tool 6) Fertilizer Dosing Measuring Spoons (ml/tbsp): “Start Low” Made Easy 7) Quality Potting Mix (Good Drainage/Aeration): The Foundation That Stops Salt Problems Bonus) All Product Comparison (One Table) Which Tool Should You Buy First? Conclusion FAQ Final Verdict Related Posts Printable ChecklistContainer-Friendly Compost (Sieved/Screened): The “Top-Dress Control” Pick
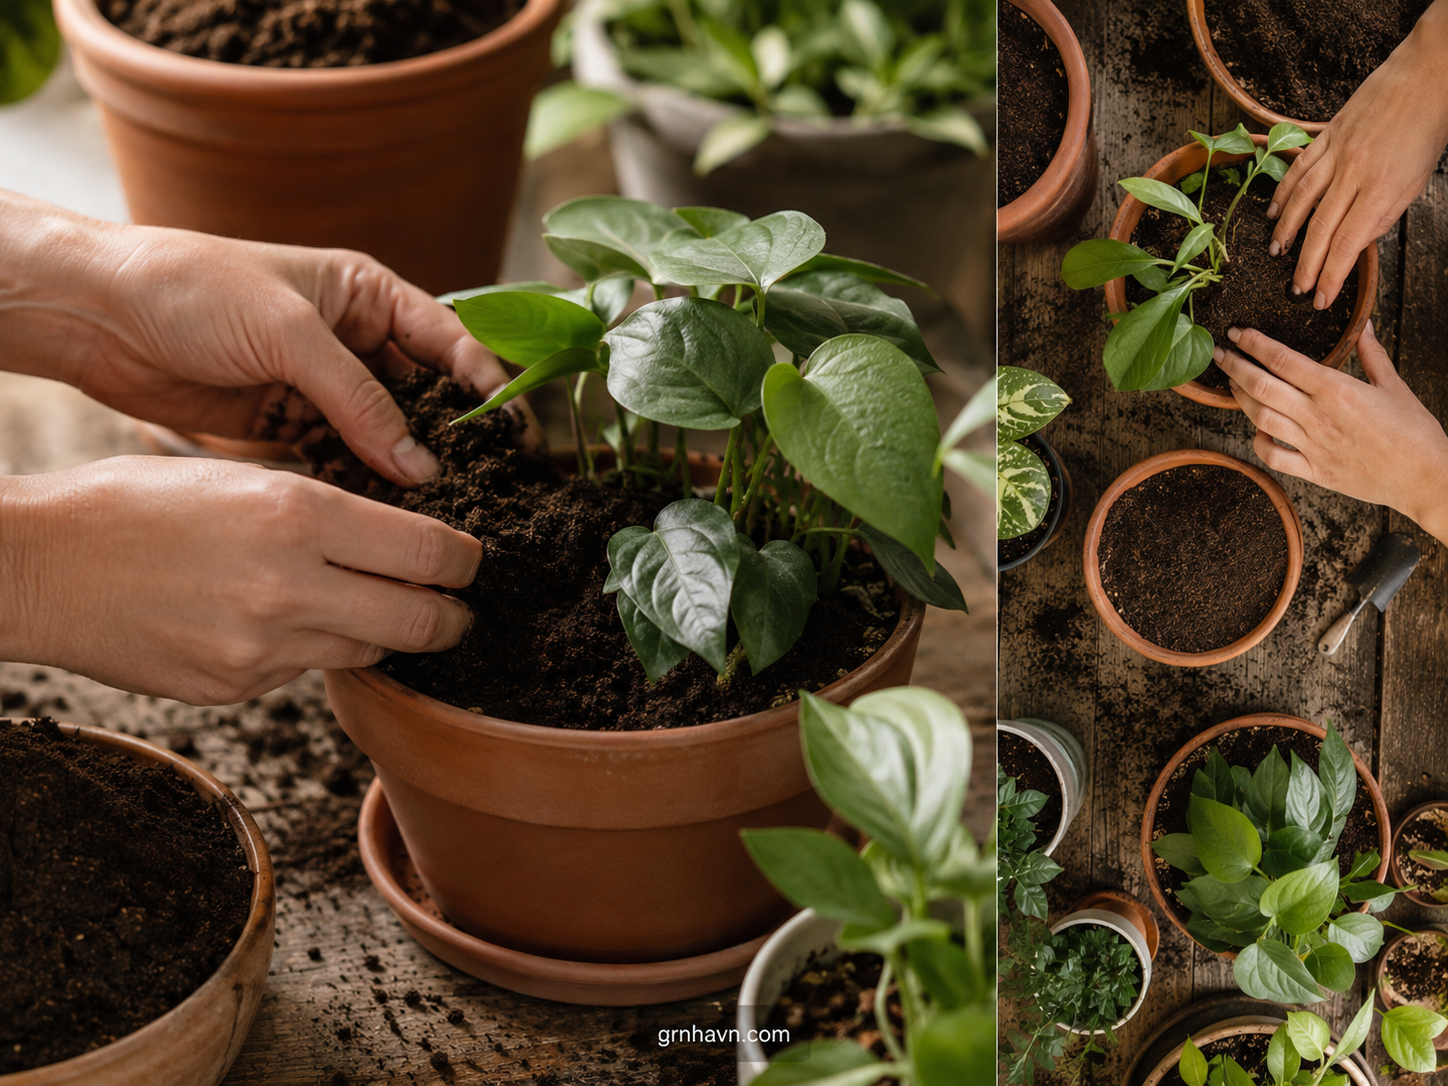
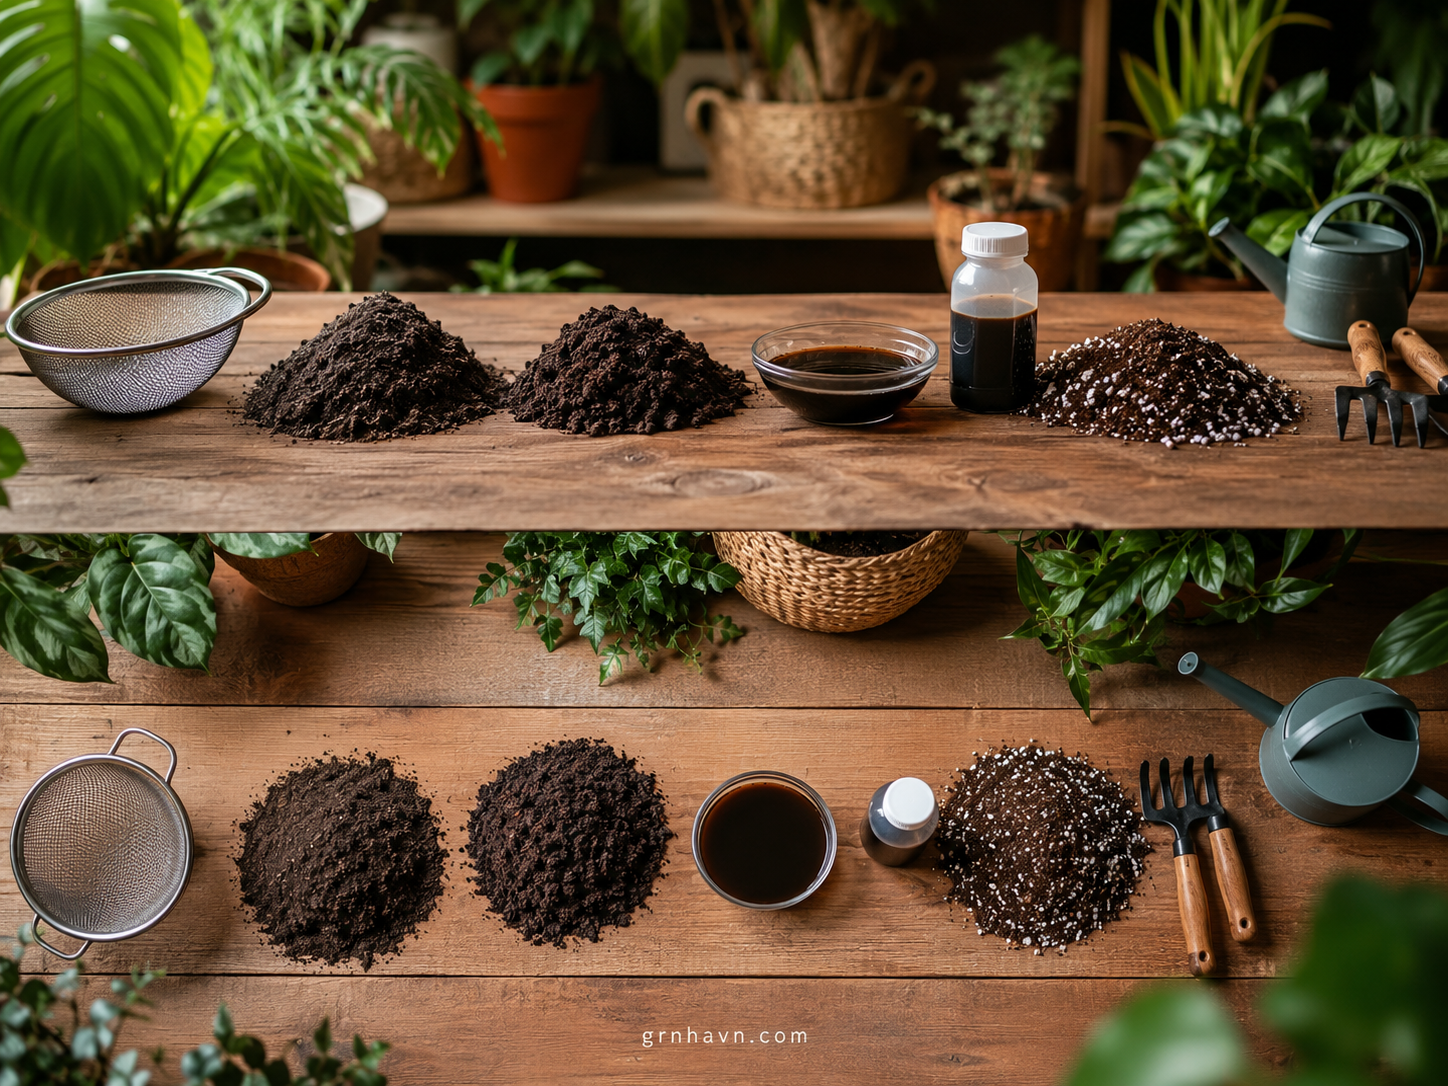
In containers, you’re not just growing a plant—you’re managing a mini ecosystem. And the biggest difference-maker is texture. When I choose best compost and fertilizer products for indoors, I look for screened compost benefits: finer, more even particles that settle gently instead of clumping into pockets.
Here’s the honest “why” behind it: screened/sieved compost makes top-dressing feel controlled. It integrates into the top layer without creating a thick, stubborn barrier. That means less risk of trapped moisture—and fewer surprises when you water.
Product Comparison — what to compare
When comparing sieved/screened vs chunky compost, favor consistency. Chunky compost can look “natural,” but in small pots the larger bits can sit unevenly, and roots don’t benefit from that. Also check: mature compost vs fresh compost. For containers, mature is calmer—less chance of “too active” behavior that can heat up and stress roots.
If you’re indoor-friendly: choose blends that stay low-odor, with a finer texture. And always think in practical terms: bagged consistency vs bulk unpredictability. Bulk compost can be great, but bagged sieved compost is easier to replicate month to month.
“A great compost product doesn’t demand attention—it quietly supports you, week after week.”
Full Guide — how to use
When to top-dress vs mix-in: for containers, top-dress first. A thin layer sits on the surface and helps soil biology without disturbing tender roots.
Application rate: start low. Think a thin layer—you’re feeding the top layer ecosystem, not replacing potting mix. In indoor containers, even “more compost” can be too much.
How often: brighten seasons (spring through early autumn) get more attention; winter slows down—give soil biology time, not pressure. For US USDA hardiness zones, I adjust based on frost-date logic and how warm your space truly stays. In Europe, temperature and shorter daylight matter—feed less when days get dim and cool.
Watering method: after application, use gentle watering. You want compost to settle, not splash and compact.
Important Discussion
Fresh compost risk in small pots is real: too active + too hot = root stress. And if you live in colder Europe months, slower temperatures mean slower breakdown—so keep doses lighter. In the US, I’ve seen people over-follow calendars. Instead, feed to growth: if your plant is pausing, stop pretending it’s “supposed” to keep moving.
How These Product Work
Screened compost works by improving soil structure at the surface, supporting microbial activity, and buffering nutrients for steady availability. It’s the “quiet backbone” that makes your other feeds safer.
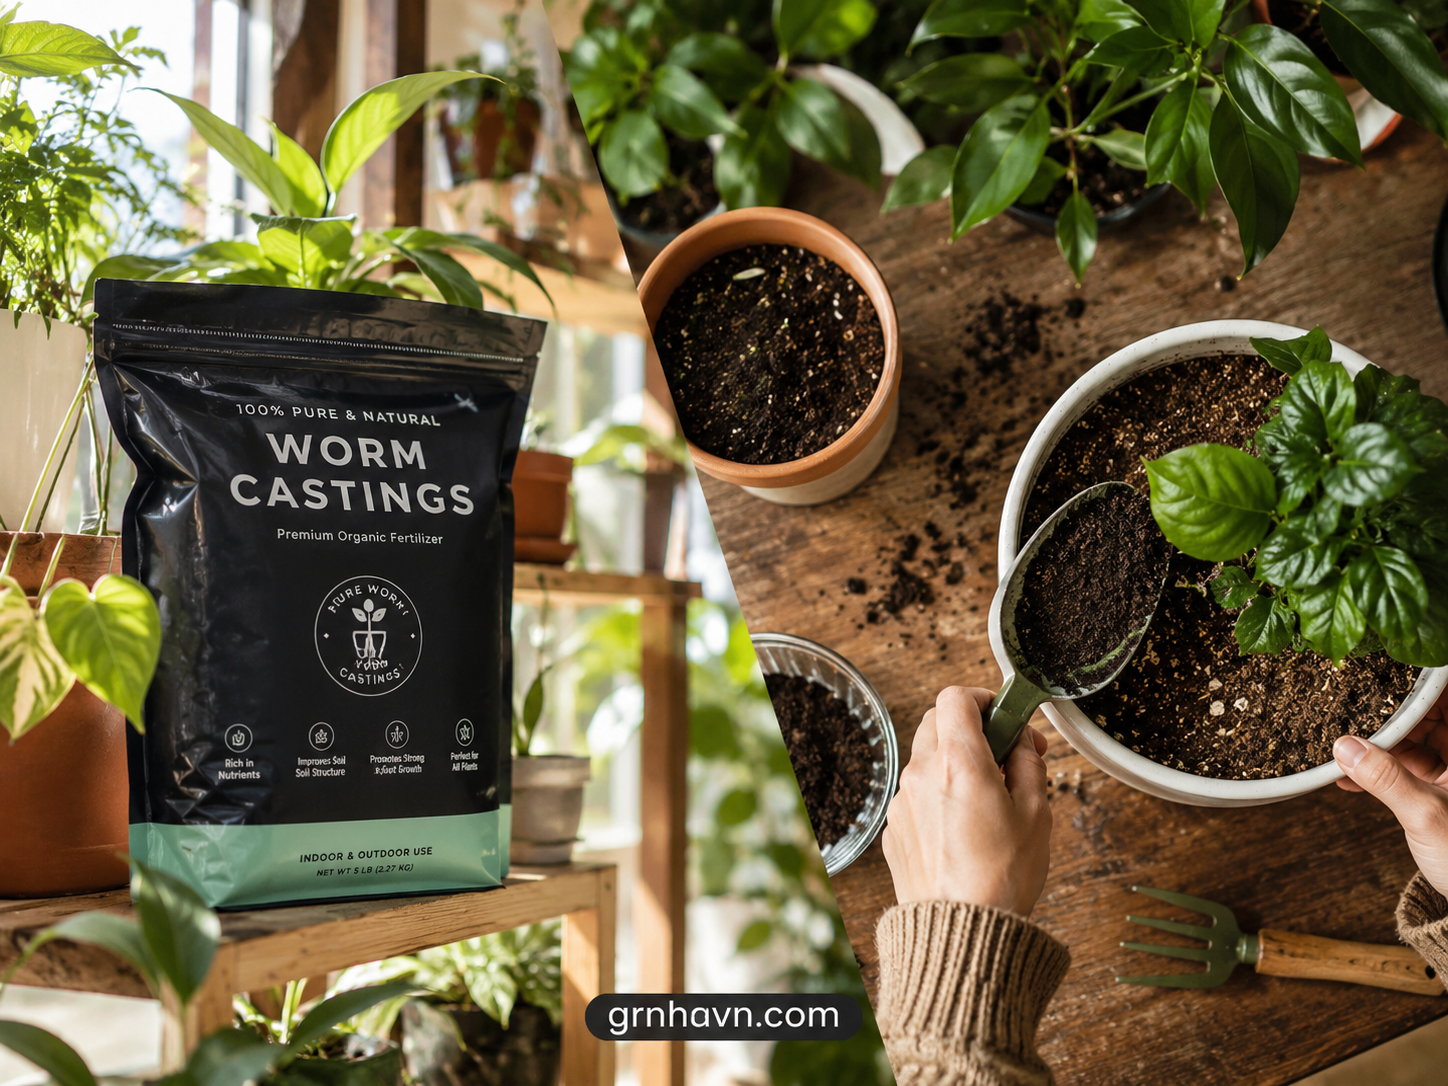
Worm Castings (Pure, Bagged): Gentle Root Support for Pots
If screened compost feels like “soil control,” worm castings feel like comfort. Pure worm castings are dependable because the nutrients are released gradually, and the texture tends to integrate nicely—especially in container gardening soil.
When I recommend pure worm castings and bagged worm castings, it’s because indoor feeding needs less chaos. You want something that supports roots without turning your pot into a fertilizer science experiment.
Product Comparison
Compare pure castings vs blended castings. Blends can be fine, but “what’s inside” matters more indoors. Also check texture: fine vs coarse texture changes how evenly it distributes. And be careful with labeling: bagged purity vs products marketed as “worm compost” of mixed ingredients can vary.
“The best feeding tool is the one that never makes you guess—just like a calm, steady friend.”
Full Guide
Best way in containers: top-dress + water in lightly. Start small for indoor plants because you’re working with limited soil volume. As a rule of thumb, apply every 4–6 weeks during active growth, and less often in winter.
Signs you need to reduce: dull growth, soil staying damp longer than usual, or that “heavy” feeling in the pot. (When moisture hangs around, nutrient accumulation can become the problem.)
Important Discussion
Worm castings can still build up in containers—especially if you keep applying during low light. If you notice odor changes or consistently soggy soil, adjust frequency. In both the US and Europe, winter indoor light often drops; feed less and let the plant do its quiet work.
How These product Work
Worm castings add organic matter, support beneficial biology, and release nutrients slowly—reducing the chance of fertilizer burn compared to aggressive synthetics.
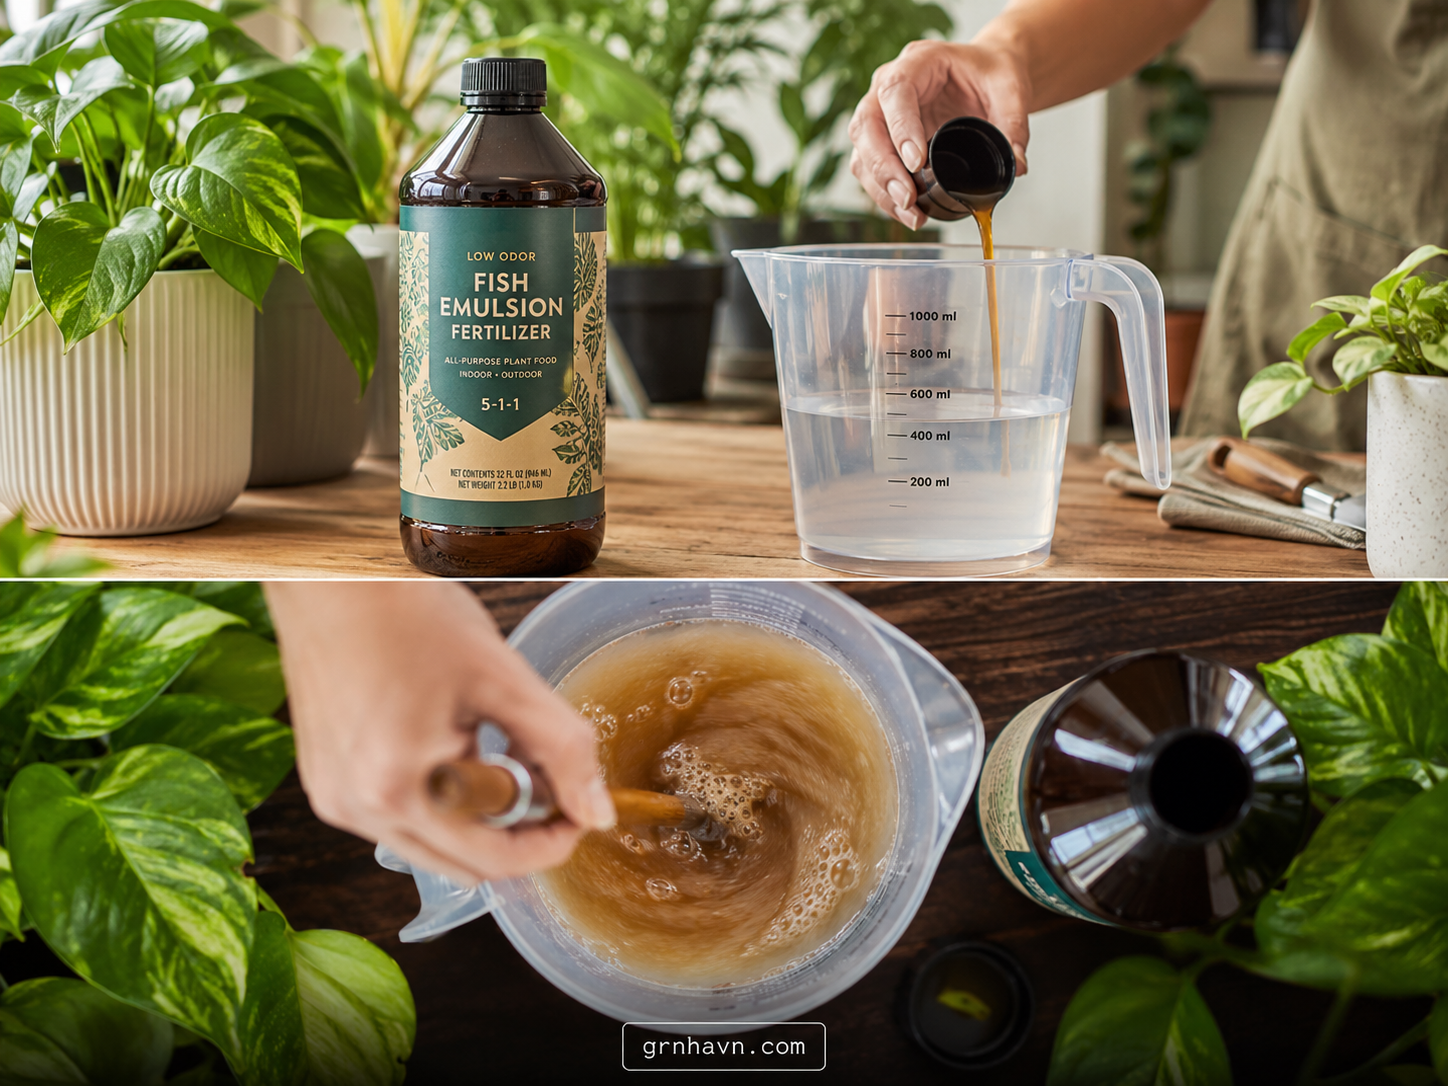
Low-Odor Fish Emulsion (Indoor-Friendly): Liquid Nitrogen Support (Dilution First)
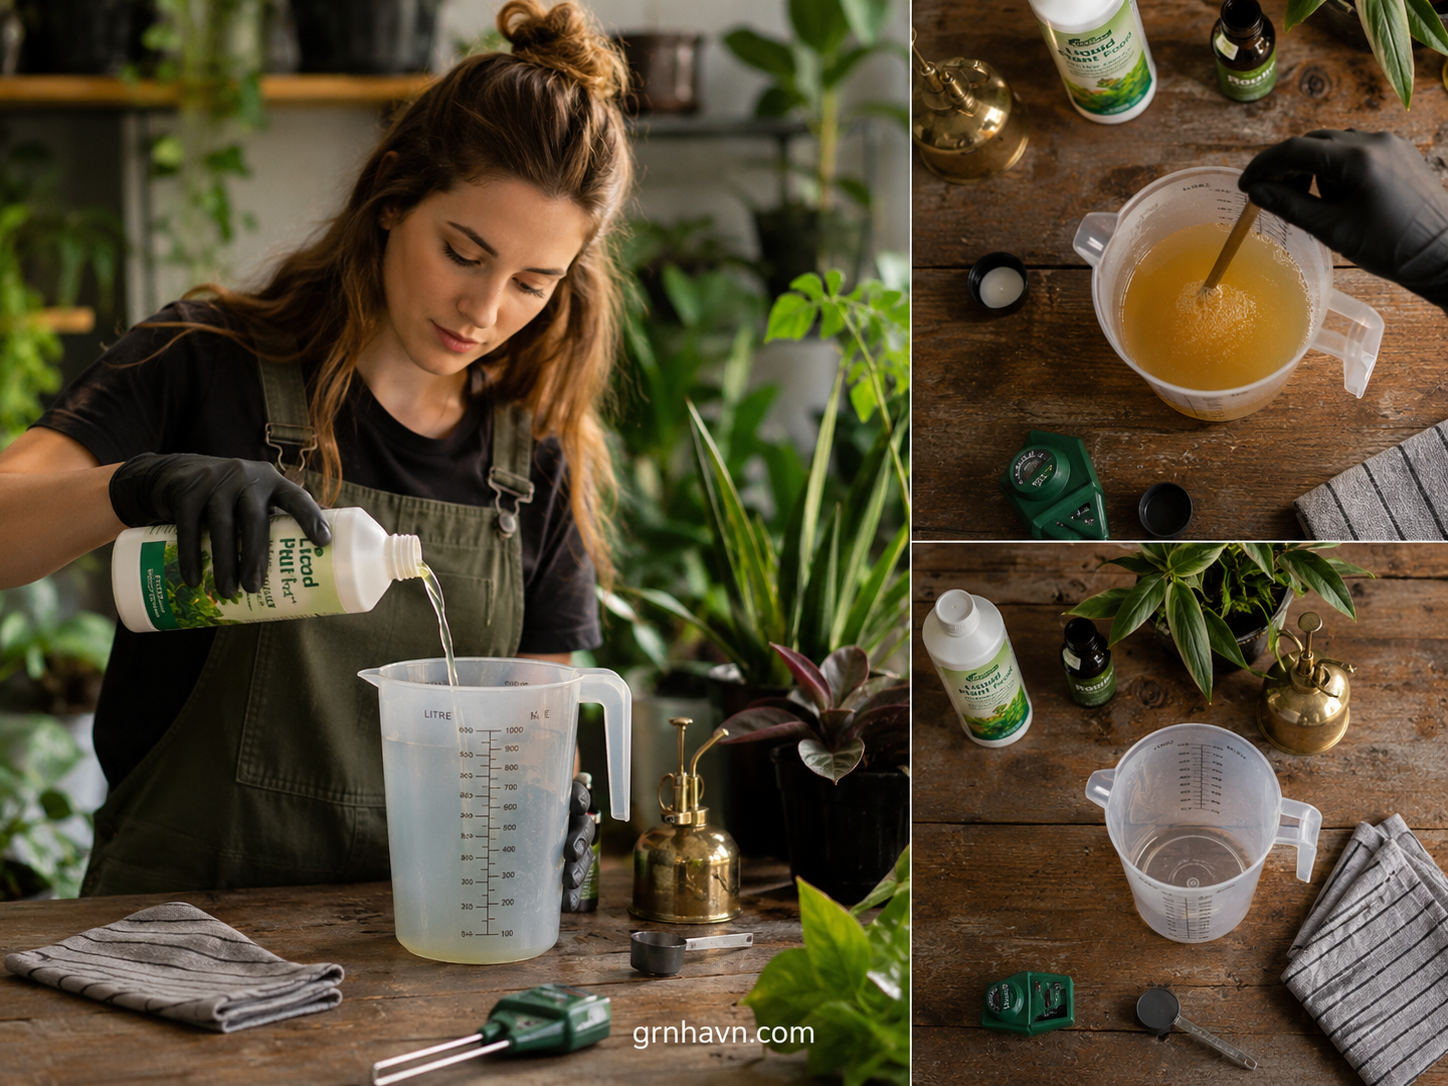
Low-odor fish emulsion is one of my favorite “indoor plant feeding” shortcuts because it’s liquid—so it distributes quickly— but it’s also easy to overdo. That’s why I’m emphasizing how to dilute fish emulsion safely before anything else.
If your space is shared (or your plant lives close to you), smell matters. That’s where low-odor fish emulsion shines: gentler indoor use without the dramatic room-stinking moments.
Product Comparison
Compare low-odor vs strong-smell fish emulsion. Also check liquid concentration consistency—bottle-to-bottle differences do happen, so read the label every time. Look for indoor-friendly formulations with reduced odor and clear dilution guidance.
“Dilution is love. The label isn’t being bossy—it’s protecting your roots.”
Full Guide
Fish emulsion dilution method: label-first dilution. Start with a start-low dosing strategy for your first 1–2 feedings. In plain terms: choose a weaker mix than you think you need.
When to apply: only during active growth—spring warmth, bright windows, and steady leaf production. Application: begin as a soil drench for beginners. Foliar is trickier and can be messier indoors.
Important Discussion
Over-dilution can still lead to fertilizer burn and salt stress. If you live in hard-water areas (common in parts of the US) or cold climates (common in Europe), uptake can be slower, so the plant may not “process” nutrients quickly. Timing rule: if growth stalls, reduce or pause.
How These Product Work
Fish emulsion supports nitrogen-driven growth and helps plants bounce when conditions are good—light, warmth, and proper watering.
Graduated Mixing Jug (mL + oz/gal scale): Accuracy That Prevents Mistakes
This is the tool that quietly saves your plants. I’ve watched “healthy plant owners” struggle—not because they lack care, but because they eyeball fertilizer strength. That’s how small mistakes become consistent stress.
A mixing jug for plant nutrients with both metric and US scale makes dilution easier across Europe + America. It also turns fertilizer dosage guide math into something you can do without fear.
Product Comparison
Choose a graduated jug with both metric + US scale. Prefer a pour spout control design (less mess than wide openings). Pick the size based on how much water you typically mix (gallon vs liter batches).
“Accuracy isn’t fancy. It’s kindness for your future self and your plant’s roots.”
Full Guide
Measure concentrate correctly—no guessing. And yes: set up a routine. Keep one dedicated mixing jug for fertilizer so you never accidentally cross-contaminate with household liquids.
Cleaning routine matters: residue can build up and change future mixes (and the results).
Important Discussion
US/EU unit conversion mindset: don’t panic between ounces and liters—use the markings. Faster mixing isn’t safer—accuracy is. And when your concentration is correct, salt buildup risk drops.
How These product Work
This tool improves consistency, which improves plant outcomes—especially when using organic feeds where label dilution is your safety net.
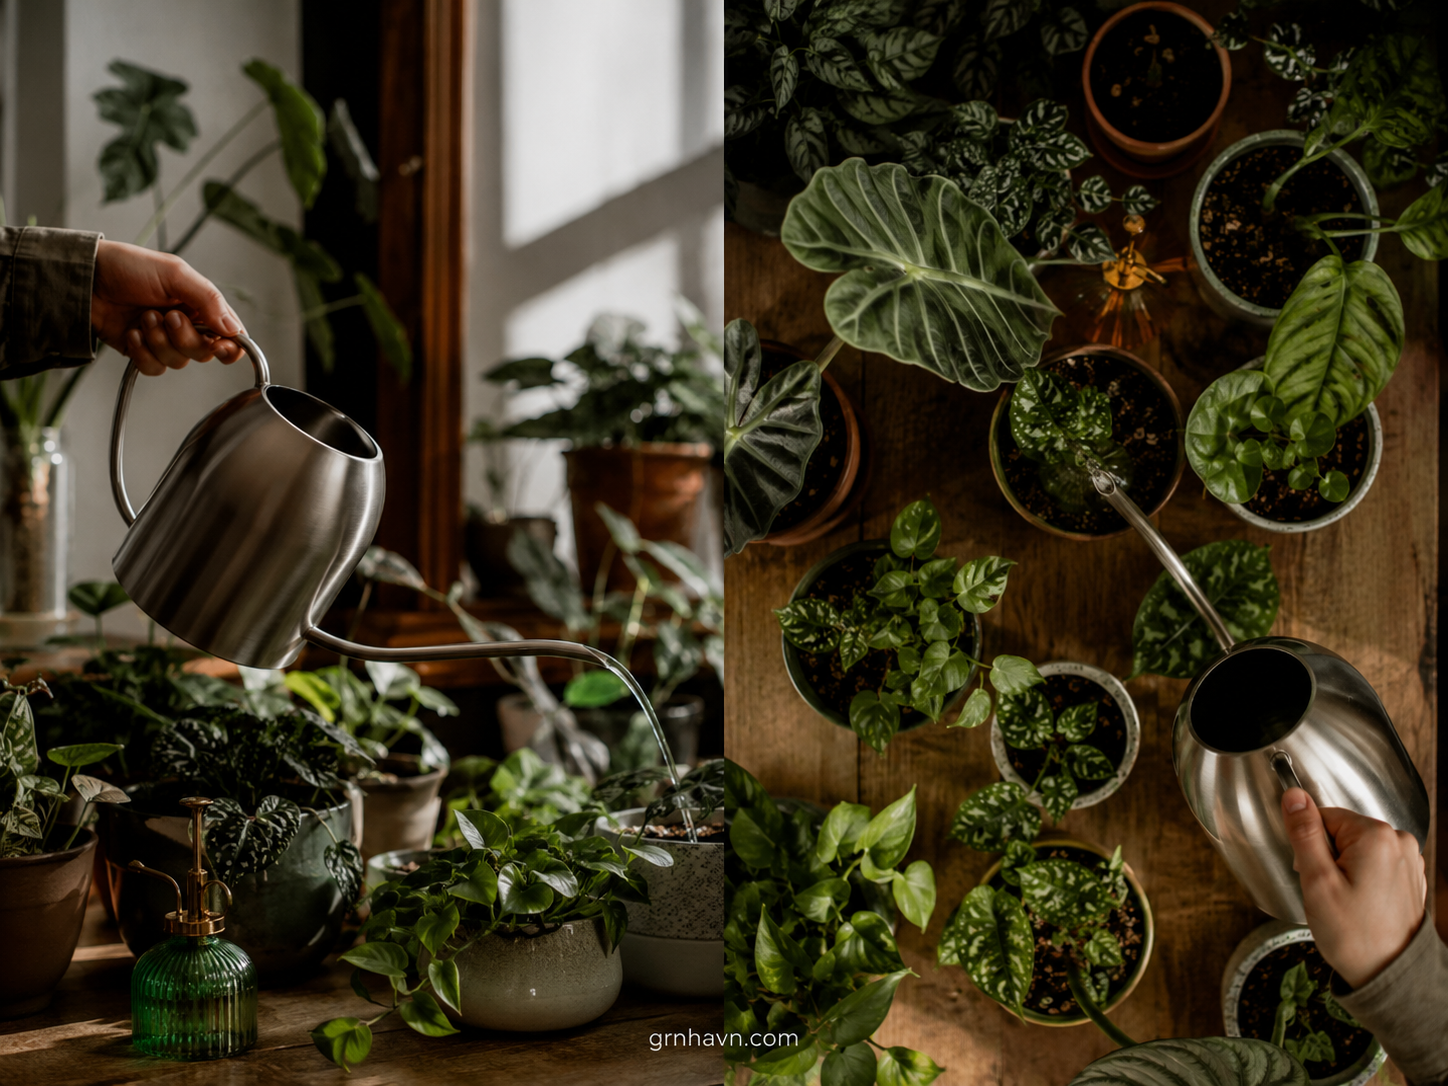
Small Watering Can (Fine Spout): The Flushing & Gentle Feeding Tool
I call this the “control pen” of container care. When you fertilize, you don’t just feed—you also manage salts. A small watering can with a fine spout helps you pour evenly, avoid blasting, and flush when needed.
Product Comparison
Prefer fine spout control over bulky spouts. Flow rate should be steady—not aggressive. A gentle, drainage-friendly watering style helps reach the root zone evenly.
“Your plant can forgive mistakes—but it can’t forgive inconsistent watering.”
Full Guide
Apply liquids evenly around the base. And here’s a beginner-friendly rhythm: water before feeding so the soil is moist, not dry. That reduces burn risk.
If you’re flushing fertilizer salts, do it slowly and thoroughly until you see proper drainage. Container safety tip: don’t let runoff sit in saucers.
Important Discussion
Dry-soil feeding increases burn risk because nutrients concentrate in the wrong places. US/EU seasonal advice: when stress episodes happen (heat spikes or cold snaps), flush/reset instead of forcing another dose.
How These product Work
Fine-spout watering supports even distribution and helps you control how salts move through the pot—critical for container gardening soil.
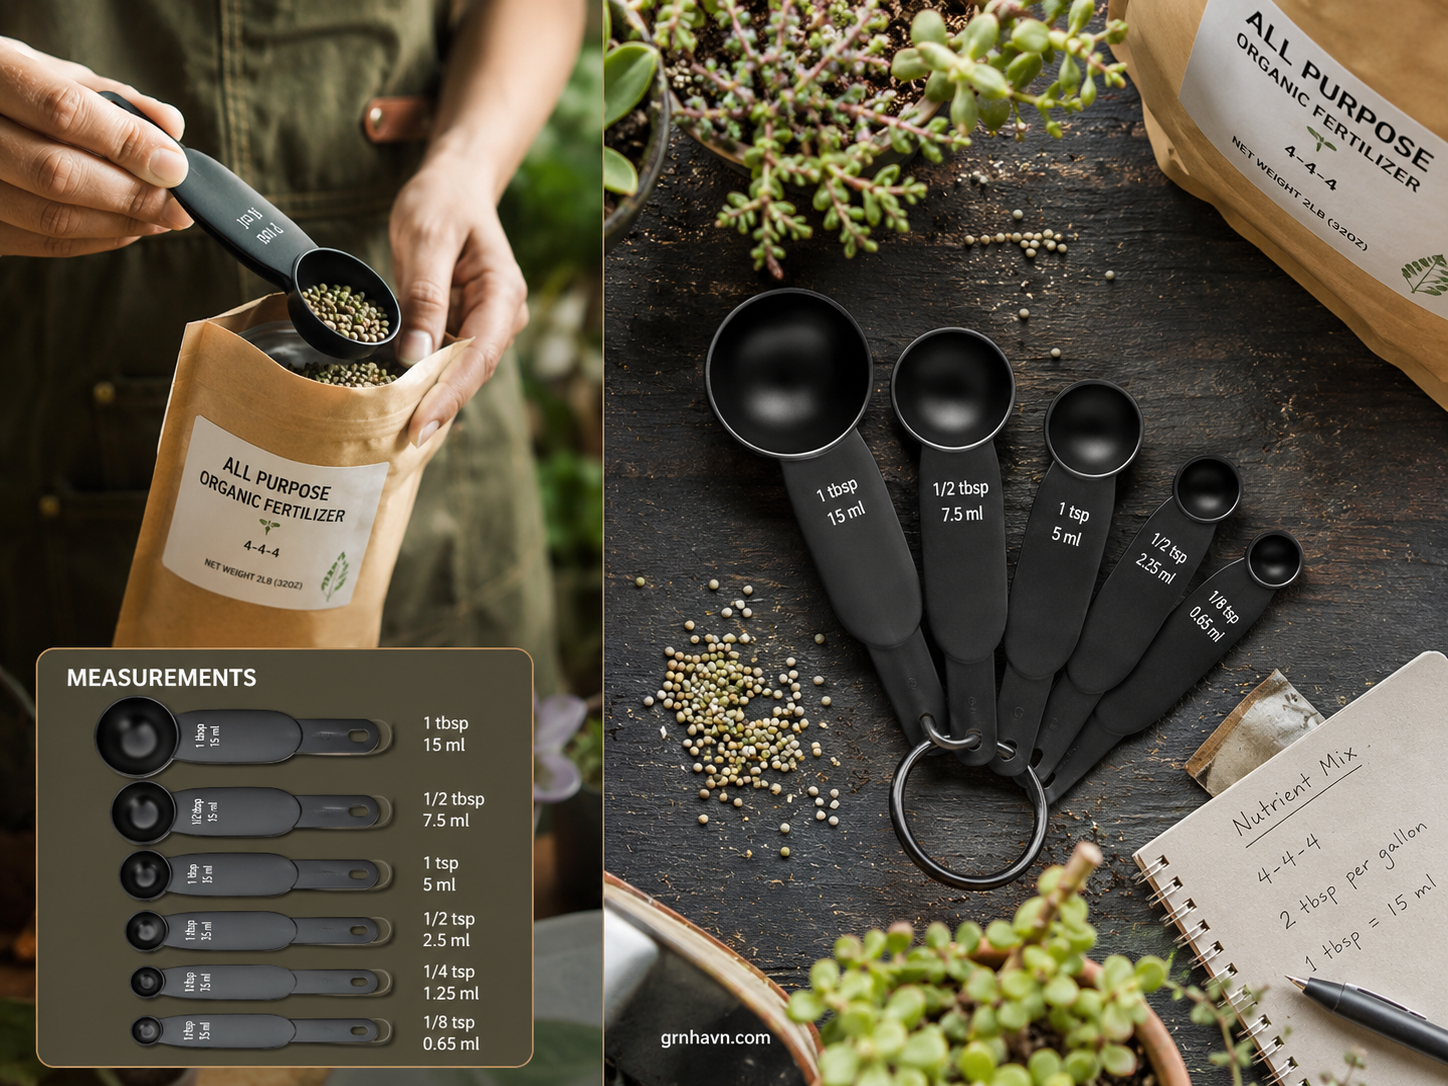
Fertilizer Dosing Measuring Spoons (ml/tbsp): “Start Low” Made Easy
Here’s a truth I learned the hard way: the most common fertilizer mistakes are concentration stacking—not “bad plants.” When your dose is inconsistent, nutrients build up unevenly and the roots pay the price.
Measuring spoons with ml/tbsp markings make the “start low” approach simple, especially when labels use different formats. You’ll also use them for organic feeds, so the stakes feel personal.
Product Comparison
Look for accurate markings (ml, tsp, tbsp). Choose dishwasher-safe durability. Sets that nest can be helpful, but a reliable single spoon is often enough if accuracy is your goal.
“When you measure, you stop guessing—and your plant starts relaxing.”
Full Guide
Use spoons with label rates. Your beginner rule: start with 1/4–1/2 label strength. After feeding, wait 7–14 days before increasing—watch the plant response, not your anxiety.
Keep notes: date, dose, and what changed. This is how you build confidence and avoid fertilizer burn over time.
Important Discussion
Most fertilizer mistakes = concentration stacking. Consistency prevents fertilizer burn. And unit awareness matters: ml vs tbsp mixing mistakes happen quickly—so measure with care.
How These product Work
Dosing spoons translate label math into real life. That’s how you maintain a steady NPK balance for compost and gentle organic plant care.
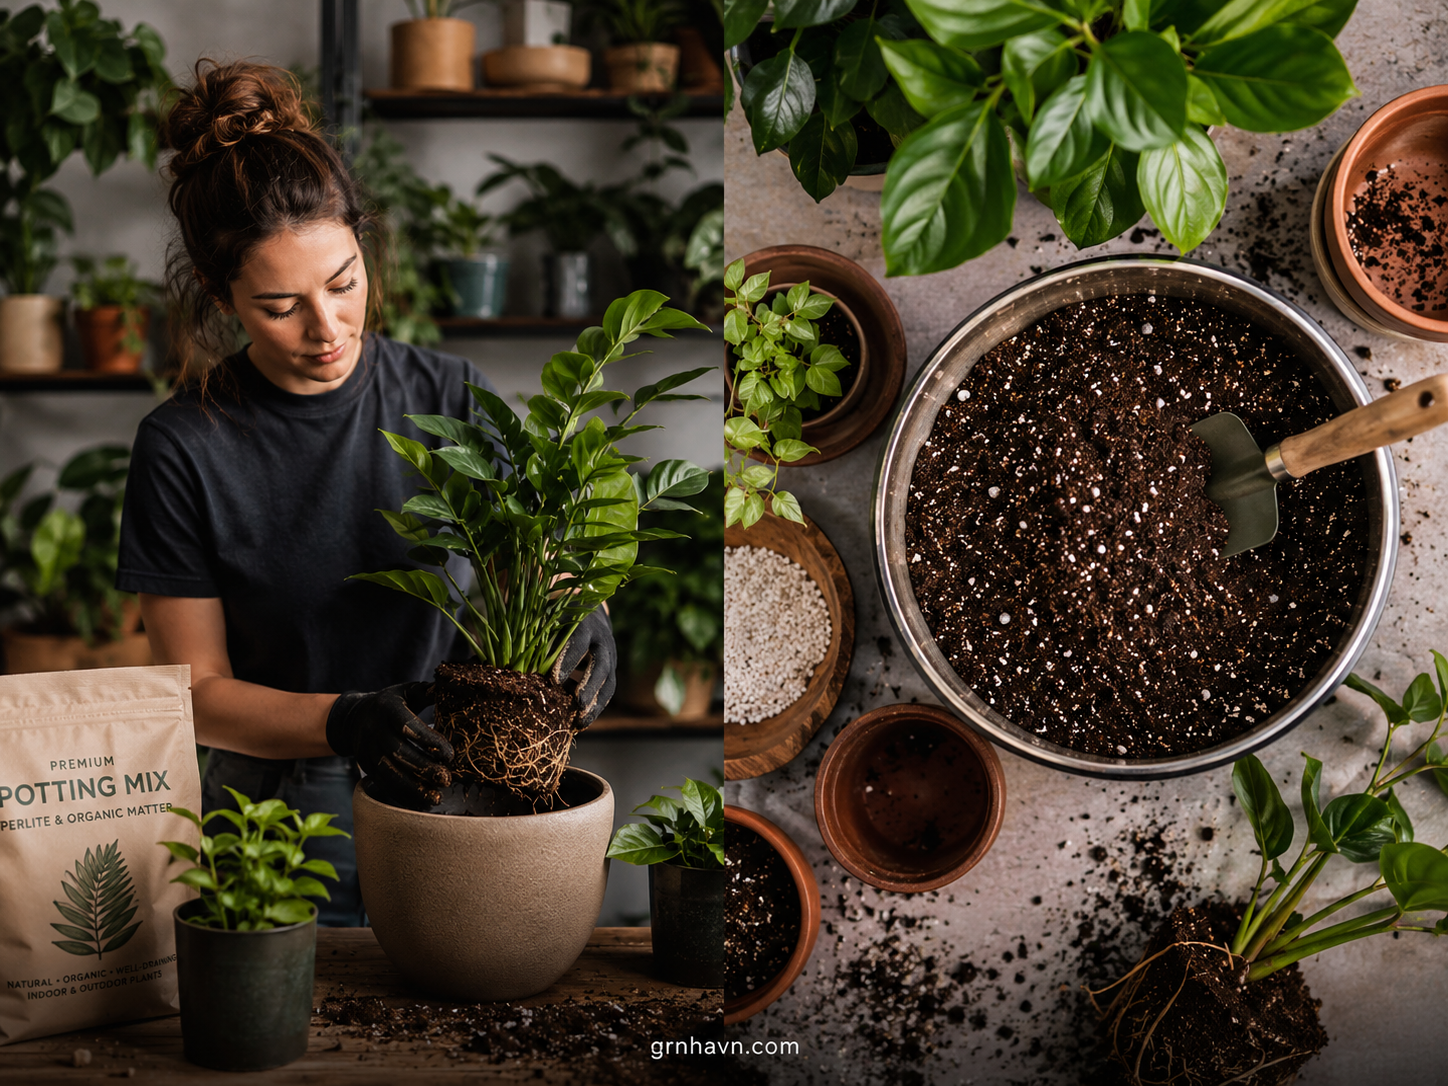
Quality Potting Mix (Good Drainage/Aeration): The Foundation That Stops Salt Problems
If compost and fertilizer are the “food,” potting mix is the “kitchen.” And in container gardening, the kitchen decides whether nutrients help or harm. Good drainage and aeration prevent damp, salty buildup that can come from overfeeding.
I’m especially protective about this step because indoor watering patterns can be deceptive: it might feel like you’re watering “normally,” but the soil holds on to salts when drainage is poor.
Product Comparison
Compare aeration-focused mixes vs moisture-retentive blends. For containers, you want container-safe ingredients—nothing that compacts hard or suffocates roots. Organic vs conventional doesn’t matter as much as drainage and structure.
“Strong plants start underground—where good drainage quietly turns stress into recovery.”
Full Guide
Potting mix affects nutrient uptake speed. When the mix is airy, nutrients move more predictably. Repot when you see compacted soil, persistent salt residue, or uneven drying.
Pairing guidance: compost/castings work best with an airy mix to prevent damp buildup. Indoor watering strategy: water fully, then allow partial dry—don’t keep the pot in permanent “maybe.”
Important Discussion
Salt buildup is often a drainage + dosing combo. In colder Europe seasons, slower drying means you must feed lighter and water thoughtfully. In the US, dry heated indoor air can mask moisture issues—still rely on drainage testing (not vibes).
How These product Work
Quality potting mix improves airflow, reduces risk of salt stress, and gives compost/castings a supportive environment.
All Product Comparison (So You Can Choose With Confidence)
| Product | Best For | Indoor-Friendly Notes | Key Watch-Out |
|---|---|---|---|
| Sieved/Screened Compost | Top-dress control + soil support | Low odor, finer texture for pots | Fresh compost can be too active in small pots |
| Pure, Bagged Worm Castings | Gentle root support | Gradual release, consistent texture | Containers can still accumulate—reduce in winter |
| Low-Odor Fish Emulsion | Liquid nitrogen support | Smell-reduced indoor use | Overdosing can cause fertilizer burn/salt stress |
| Graduated Mixing Jug | Accurate dilution | mL + oz/gal scale helpful for US/EU | Residue can contaminate future mixes—clean well |
| Small Fine Spout Watering Can | Even feeding + flushing | Gentle, controlled pour | Don’t feed on dry soil; avoid runoff sitting in saucers |
| Measuring Spoons | Start-low dosing | Easy ml/tbsp accuracy | Concentration stacking from inconsistent dosing |
| Good Drainage Potting Mix | Prevents salt problems | Air + structure for roots | Drainage issues amplify overfeeding risk |
Which Tool Should You Buy First?
H3: Best Choice for Beginners
Start with a measuring spoon set and good drainage potting mix. It’s the safest combo: you prevent the two biggest indoor problems—over-concentration and slow drying. Once you feel calm, add worm castings for gentle support.
H3: Best Choice for Tree Growers
If you’re building size, choose sieved/screened compost plus low-odor fish emulsion (diluted label-first). Trees benefit from steady organic nutrition, but containers demand caution—flush salts and adjust feeding to growth, especially with slower winter light in Europe and different indoor conditions in the US.
H3: Best Choice for Content Creators
For “show-your-results” consistency: grab a graduated mixing jug and a small fine-spout watering can. Accurate mixing and even watering mean repeatable growth—so your progress photos actually look like progress.
H3: Best Overall Value
My overall pick is bagged worm castings + quality potting mix. It’s the “low odor, low drama” path to organic plant care that supports roots without pushing risky dosing. Then add fish emulsion only when you’re ready.
Conclusion: Build a Gentle Feeding Routine That Your Plants Can Actually Trust
Here’s my lived-in opinion: the best fertilizers and compost aren’t “magic.” They’re consistent. And consistency is what makes indoor plant feeding feel supportive instead of stressful.
Use screened compost for gardening when you want top-dress control. Choose pure worm castings for root-friendly, gradual support. Add low-odor fish emulsion only with dilution first and a start-low strategy. Then protect everything with a potting mix with good drainage/aeration and a watering style that flushes when salts build up.
Whether you’re in the US with USDA hardiness zones and frost-date logic, or in Europe where temperature and daylight steer growth, the rule stays the same: match feeding to plant activity. When growth slows, lighten up. When it truly wakes, you can feed again— calmly, accurately, and with confidence.
“If you want healthy leaves, start by choosing products that help you measure, water, and repeat—without fear.”
Frequently Asked Questions
1) What are the best container fertilizer essentials for beginners?
Start with measuring spoons for fertilizer and a mixing jug for plant nutrients. Then add a drainage-forward potting mix. Those three basics prevent the most common indoor mistakes—over-concentration and slow drying.
2) How do I know if my plant needs fertilizer or just better light?
If new growth is slow while the plant seems otherwise stable, check light first. Fertilizer can’t replace sun or strong brightness. If growth is actively starting (new leaves, steady stems), then dilute and feed lightly.
3) Can I use compost in pots without causing problems?
Yes—choose sieved/screened compost for gardening and top-dress with a thin layer. Keep it mature compost, not fresh, for small containers. Water gently right after.
4) How much compost should I top-dress in an indoor container?
Start minimal: a thin surface layer is enough. Indoor pots have limited volume, so “more” can quickly turn into soggy, inactive soil or salt-related issues.
5) How often should I apply worm castings to container plants?
During active growth, aim for every 4–6 weeks. In winter or low-light periods, reduce frequency—especially if soil stays damp longer than usual.
6) Will worm castings cause fertilizer burn or salt buildup?
They’re gentle, but buildup can still happen in containers if you keep feeding when light is low. Watch for damp soil longer than expected and adjust frequency.
7) How do I dilute fish emulsion safely (label-first)?
Read the label and dilute first—then start low for the first 1–2 feedings. Use a mixing jug and measure carefully. Never skip the dilution step.
8) Is low-odor fish emulsion actually better for indoor use?
It’s usually easier on the space you share. Low-odor formulas reduce the “indoor stink” factor while keeping the organic nutrition benefit for active growth.
9) What’s the safest start-low dilution for fish emulsion?
Follow the label, but begin at 1/4–1/2 strength for your first feedings. Increase only after 7–14 days if the plant responds positively.
10) What does fertilizer burn look like in containers (signs to watch)?
Look for browning leaf tips, crispy edges, slowed growth, or soil that seems “overfed” even after watering. Salt stress often shows as crustiness on soil surface.
11) How can I flush fertilizer salts from potted plants correctly?
Water slowly until you see drainage, letting salts move through the pot. Don’t let runoff sit in saucers. Then resume a gentler feeding schedule.
12) Should I feed on dry soil or moist soil?
Always feed on moist soil. Dry soil concentrates nutrients and increases burn risk. Water first, then feed gently.
13) Are mixing jugs and dosing spoons worth it for fertilizer accuracy?
In my experience, yes. These tools make dosing consistent across seasons and across US/EU measurement formats—so your results become repeatable.
14) How does potting mix drainage affect salt buildup and overfeeding risk?
Poor drainage keeps salts in the root zone longer. Aeration and drainage help flush salts naturally during proper watering, reducing overfeeding risk.
15) How should feeding change in winter for US/EU indoor plants?
Feed less. Shorter daylight and cooler temps slow growth, so nutrient uptake slows too. In both regions, adjust to actual growth and indoor light—not a fixed calendar.
Final Verdict: Choose Control, Consistency, and Start-Low Feeding
If I had to summarize my years of container plant experience into one warm recommendation, it’s this: choose products that help you control texture and dosing. Sieved compost gives you top-dress structure. Bagged worm castings offer gentle, steady root support. Low-odor fish emulsion works beautifully when diluted label-first—and only when your plant is genuinely growing.
And please don’t underestimate the tools: measuring spoons for fertilizer and a mixing jug for plant nutrients turn uncertainty into safety. Then your watering can (fine spout) helps flush salts instead of trapping them. That combination is how indoor plants stay healthy, and how you stop feeling like you have to “fix” problems after they happen.
Your Indoor Container Feeding Checklist
- Pick screened compost (top-dress first in containers; thin layer only).
- Use mature compost, not fresh, for small pots.
- Apply worm castings every 4–6 weeks during active growth; less in winter.
- Choose low-odor fish emulsion for indoor use.
- Dilute label-first, and start at 1/4–1/2 strength for first feedings.
- Measure accurately (mixing jug + measuring spoons).
- Feed on moist soil (water before feeding).
- Flush salts with slow thorough watering until proper drainage.
- Use a drainage/aeration potting mix to reduce salt risk.
- Adjust for seasons: US uses zone/frost logic; Europe uses temperature + daylight (feed to growth).
- Watch signs: dull growth, damp soil lingering, tip burn/crusty residue = reduce or pause.